Red Team Tactics: Writing Windows Kernel Drivers for Advanced Persistence (Part 1)
Introduction
This post, as indicated by the title, will cover the topic of writing Windows kernel drivers for advanced persistence. Because the subject matter is relatively complex, I have decided to divide the project into a three or a four part series. This being the first post in the series, it will cover the fundamental information you need to know to get started with kernel development. This includes setting up a development environment, configuring remote kernel debugging and writing your first “Hello World” driver.
If everything goes as planned, the subsequent posts in the series will cover the following topics:
- Part 2: Creating a network trigger for remote control of the kernel driver
- Part 3: Creating processes from the kernel
By the end, you should have a driver that can be triggered remotely with a custom network packet to create highly-privileged processes on the target system. That’s some nice persistence, if I do say so myself! With that being said, let’s get started!
Disclaimer
I am writing these blog posts as I learn and progress through the topic myself. Therefore, it may take some time for me to release follow-up posts. Thank you for your patience and don't hesitate to contact me if you spot any mistakes.
Prerequisites
To begin developing kernel drivers, you will first need to set up a lab environment. Here are the minimum requirements you will need to get started:
- 64bit CPU (4+ cores)
- 8GB RAM
- 96GB of available storage
- Microsoft account (for Visual Studio)
- Virtualization software
- I will be using VMWare Workstation 16, however any software capable of virtualization can be used
- Windows 10 or 11 ISO
- Alternatively, you can also use the MSEdge testing image
Lab Setup
The lab setup will require 2 virtual machines (VMs). One for development and the other one for testing the kernel driver. If you plan to work on this project using a Windows machine, it’s possible to get away with having just a testing VM. However, this will require you to install all the development tools on your host machine, which I wouldn’t recommend.
If you are wondering why you need a separate VM for testing, there are several reasons.
- A separate testing VM is necessary in order to effectively perform kernel debugging, as local kernel debugging has numerous limitations, such as the inability to set proper breakpoints
- Due to the critical nature of the kernel, minor mistakes in the driver code can cause the system to experience blue screens of death (BSODs) since the kernel, unlike userland processes, shares a single memory space for all of its drivers and other resources
With that out of the way, let’s get our hands dirty.
Lab network
Before we start configuring the virtual machines, let’s set up a lab network.
First, open VMWare’s Virtual Network Editor as an administrator:
Then, click on the Add Network... button and choose any unassigned network (VMNet19 in my case):

After clicking OK, you should be returned to the main menu and should see the newly created network in your list of networks. Select it, and configure it with the host-only adapter along with the appropriate subnet information.
 In this series, I will be working on the
 10.10.20.0/24 subnet, where the development VM will be assigned the IP address 10.10.20.2 and the testing VM will be assigned the IP address 10.10.20.3.
Note
Since host-only networking does not provide internet access to virtual machines, it is important to assign both virtual machines two different network adapters, such as the NAT adapter and the adapter we just created. The NAT network will provide internet access to both VMs, while the host-only network will be used for communication between them.
One advantage of this setup is that once both machines are configured, we can remove the NAT adapter from both VM’s to have an isolated network with no outbound internet access. This eliminates the risk of accidental antivirus sample submission and allows us to also modify the firewall settings of the VMs without the fear of being attacked from the local network.
Disclaimer
The blog post only covers the setup of the necessary components for kernel development. It is up to the reader to finish the setup by installing Window VMs and configuring static IP addresses.
Development VM
The development VM is the machine where most of the work will be done, so I recommend assigning it at least 4 cores, 6GB of RAM and 64GB of storage. Personally, I will be using Windows 11 22H2, but Windows 10 will work perfectly fine. With that in mind, let’s proceed to the actual configuration.
Visual Studio 2022
For obvious reasons, you will need to install Visual Studio. When installing Visual Studio, be sure to select the Desktop development with C++ workload and the Spectre mitigation libraries. If you’re unable to find the mitigation libraries, search for them in the Individual Components tab.
Windows SDK
We also need to install the Windows Software Development Kit (SDK) which is available here. This SDK contains all the documentation, header files, libraries, samples and tools required to develop applications for Microsoft Windows.
Nothing more needs to be said. Once you start installing the SDK, just click through the installation prompts until everything is completed.
Windows WDK
On top of the SDK, we also need the Windows Driver Kit (WDK). The WDK is used to develop, test and deploy drivers for Windows. You can get it from here. When installing the WDK, be sure to also install the Visual Studio Windows driver kit extension.
Note: Visual Studio must be closed in order for the extension to install correctly.
WinDbg
We’ll also need a debugger. In this case we’ll be using Windows Debugger (WinDbg Preview), which is a crucial tool for kernel development. It will mostly be used to troubleshoot our kernel driver in case of crashes or unexpected behavior.
Network Share (Optional)
Within Visual Studio we have the ability to create so called post build events, which can run a multitude of helpful commands for us after we compile our driver. One such post build event that can be created to help streamline the development process is copying of the compiled driver to a folder (configured as a network share). This network share will be used to hold all of the built drivers, which the testing VM can access.
If you have set up your lab according to my recommendations, you can save yourself the effort of configuring the share with proper access controls and permissions. Simply give everyone RWX permissions and you’re good to go.
Ultimately, your setup should look similar to this:
Testing VM
The specifications of the testing VM don’t matter as much. Just make sure to give it enough power to provide a smooth “user experience”. For example, my testing VM has been configured with 2 cores, 4GB of RAM and 32GB of storage. Once again, it is running Windows 11 22H2, but you shouldn’t have any issues if you’re running Windows 10.
Boot Configuration Data (BCD)
Next we need to set up BCD using the bcdedit command. Open an administrative prompt and type in these commands:
bcdedit /debug on
bcdedit /set testsigning on
The first command enables kernel debugging and the second command enables test signing. Kernel debugging allows us to debug the kernel of the machine, while test signing disables driver signature enforcement, allowing us to load and test our custom drivers without having to comply with Microsoft’s strict driver security regulations.
Note, that enabling test signing will result in a warning watermark being displayed in the bottom right corner of the machine as such:
Finally, we need to enable remote debugging. We can use a command similar to the one below to do so:
bcdedit /dbgsettings net hostip:10.10.20.2 port:50039
Just take note to set the hostip property to the IP of the development VM and set the port to a value between 50000 and 50039. Also, be careful not to mix up the IP addresses of the development and testing machines. In this case, we want to enter the IP address of the development machine so that it can connect to the debugging port.
If everything went as expected, you should see a generated key displayed in the console:

The significance of remote debugging will be explained later. For now, ensure that you set aside the generated key.
Firewall
To prevent interruptions during remote debugging, we will disable the firewall. To do this, you can either use the GUI or execute the following command in an administrative prompt:
netsh advfirewall set allprofiles state off
Alternatively, you can also whitelist the debugging port through the settings if you prefer not to disable the firewall entirely.
Debug Print Filter
To ensure that all of the kernel debug messages are output to a debugger, the debug print filter must be configured. The following command can be used:
reg add "HKLM\SYSTEM\CurrentControlSet\Control\Session Manager\Debug Print Filter" /v Default /t REG_DWORD /d 0xf
Note, that the machine must be rebooted for this change to take effect. It does not matter whether you reboot the VM now or after it has been set up. Just make sure to reboot it at some point.
OSR Driver Loader
OSR Driver Loader is a tool that we will use to load or “execute” our driver. One of the main advantages of using the OSR loader instead of manually configuring Windows services is that it contains a user-friendly GUI, making it easy to use.
QoL improvements (Optional)
Here are some additional tips that may help save time:
- If you have configured a network share containing the built drivers, you can mount it and add it to a convenient location such as the desktop
- Since you will most likely blue screen the machine countless times while testing the driver, it may be helpful to enable automatic login without a password and take a snapshot of the running VM so that you can easily revert to it, in case of a hard crash
Driver Development
We can finally start the development process!
Attaching WinDbg
With remote kernel debugging enabled, you should be able to remotely connect to the testing VM’s kernel from the development VM.
To do this, open your development machine and launch WinDbg. Go to the main menu and select Attach to kernel:
In the Net sub-menu type in the details of the testing VM:
In my case, the IP address of the testing VM is 10.10.20.3, the port is 50039 and the key is the value I told you to save earlier (your key will be different).
After clicking OK, you should be connected to testing machine’s kernel:

From this point on, you can set breakpoints, inspect memory addresses and more. Just keep in mind that if you set a breakpoint, the testing VM may enter a suspended (frozen) state. You’ll need to remove all the breakpoints in order for the VM to resume functioning. Furthermore, WinDbg will also be used to inspect debug print calls from our driver. Since drivers don’t have a console, using the debugger to view messages is one of the only options we have.
Project Creation
Now, let’s go ahead and create out first kernel code project! Start by opening Visual Studio and selecting Create a new project. Then, search for the Kernel Mode Driver, Empty (KMDF) template.
![]()
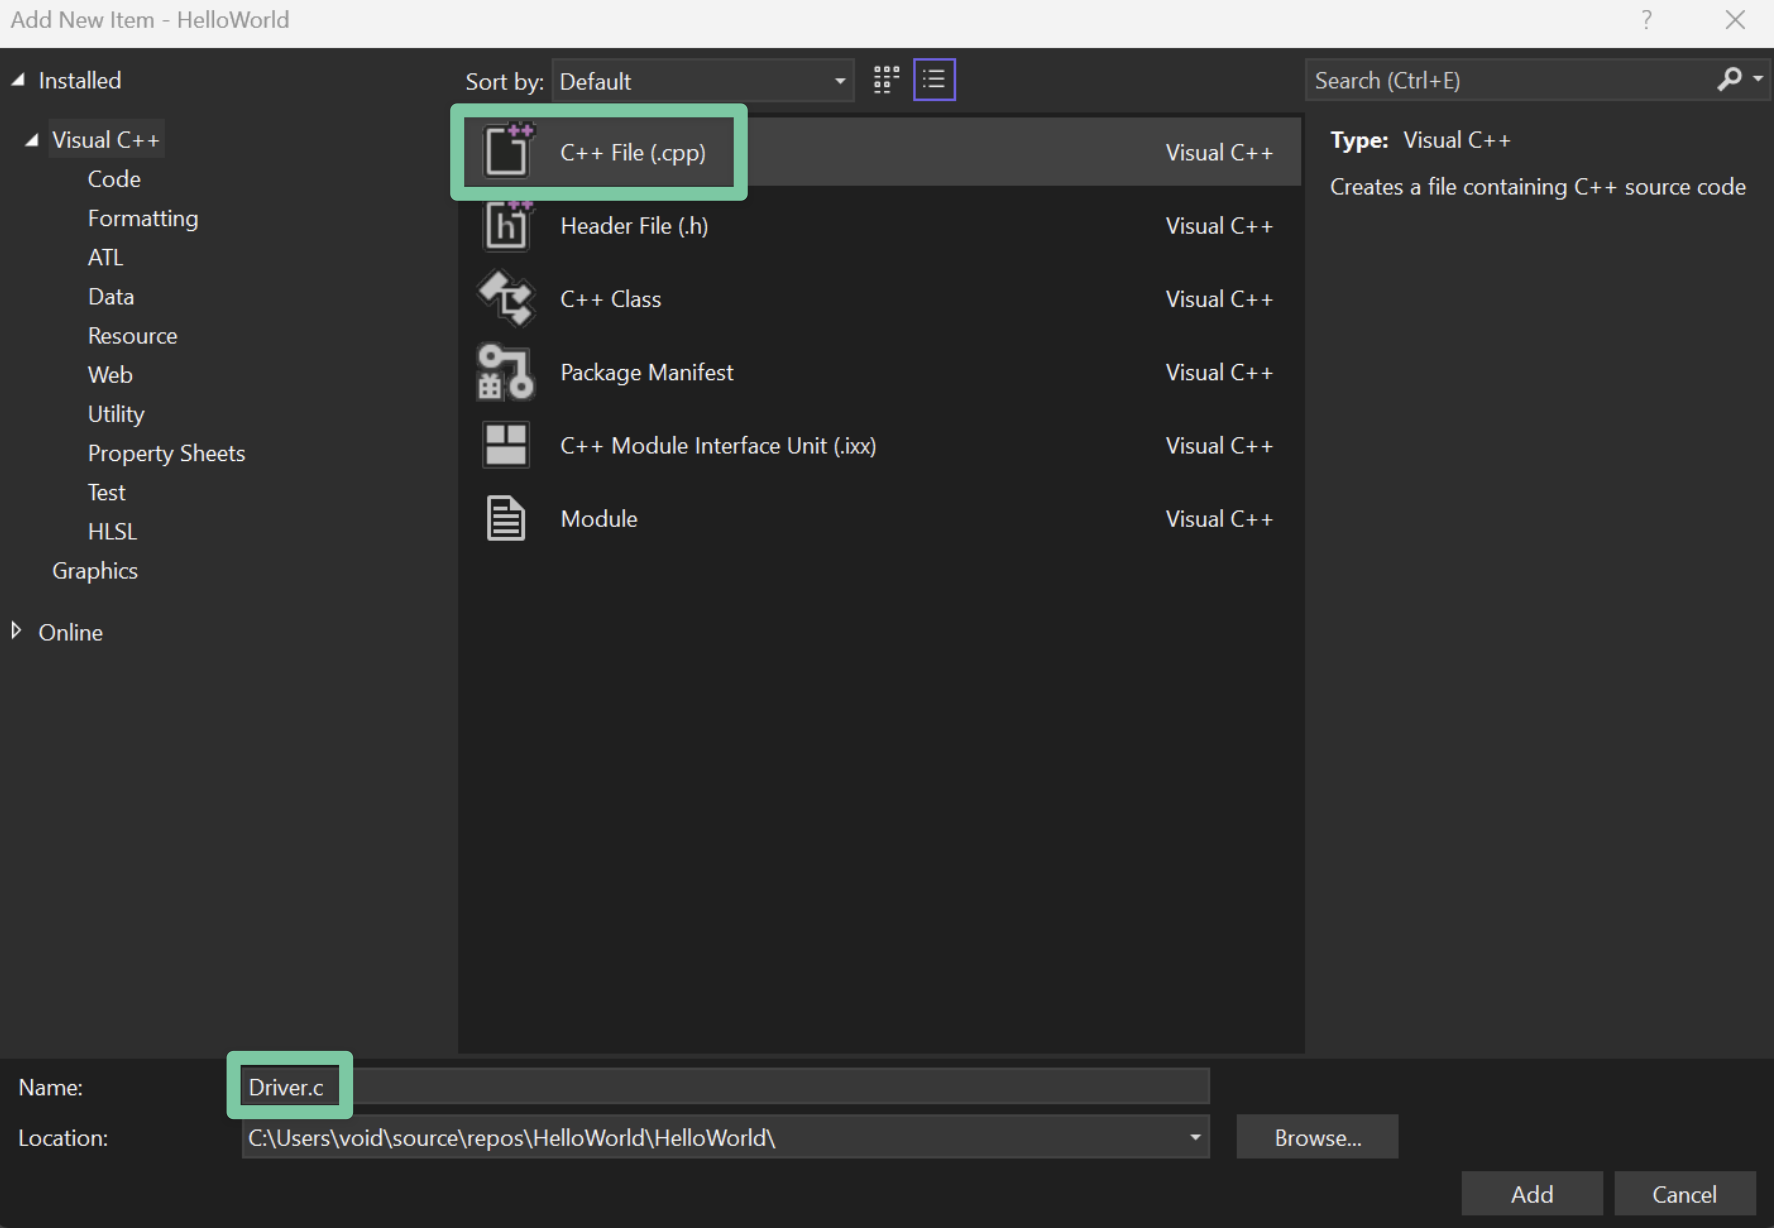
Confirm your choice and name the project HelloWorld. After Visual Studio loads the solution, right click on Source Files, then click on Add and finally New Item....

A window will open and ask you to choose an item to add to the project. Select C++ File (.cpp) and name it Driver.c. You can actually name it whatever you want, just make sure to give the file a .c extension.
Hello World!
We’re getting to the good stuff! In this section, we’ll finally start writing the driver.
Warning
In order to write kernel drivers, it is necessary to have a good understanding of the C programming language. If you are not familiar with C, it is advisable to refresh your skills before proceeding further.
All drivers require a DriverEntry routine, which is responsible for the driver’s initialization. Think of it like the main function in standard C programs.
We can create a simple DriverEntry routine for Driver.c file which will look like so:
1
2
3
4
5
6
7
8
#include <ntddk.h>                  // Kernel header

NTSTATUS DriverEntry(_In_ PDRIVER_OBJECT driverObject, _In_ PUNICODE_STRING registryPath) {
    KdPrint(("Hello World!\n"));    // Printf "equivalent"
                                    //  - Only prints data when build settings are set to 'Debug',
                                    //    otherwise doesn't do anything
    return STATUS_SUCCESS;
}
In addition to an entry routine, we also need something called an “exit” routine that gets called every time the driver is unloaded. The main difference between the exit and entry routine is that the exit routine does not have a predetermined name. As such, we need to manually specify the unload routine when initializing the driver.
In my case I created a new exit routine called DriverUnload. The updated Driver.c file after the routine is added should look like this:
1
2
3
4
5
6
7
8
9
10
11
12
13
#include <ntddk.h>

NTSTATUS DriverUnload(_In_ PDRIVER_OBJECT driverObject) {
    KdPrint(("Goodbye World!\n"));
    return STATUS_SUCCESS;
}

NTSTATUS DriverEntry(_In_ PDRIVER_OBJECT driverObject, _In_ PUNICODE_STRING registryPath) {
    KdPrint(("Hello World!\n"));
    driverObject->DriverUnload = DriverUnload; // Set the unload function to DriverUnload

    return STATUS_SUCCESS;
}
That’s almost everything, programming wise! There is just one issue that we need to address. If you try and build the solution now, it will fail with a somewhat annoying error message:
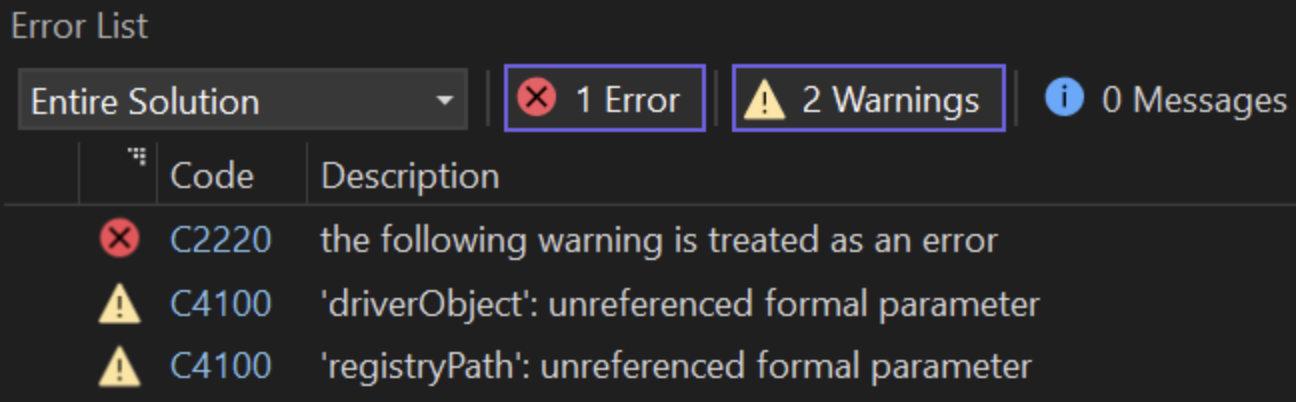
Because the kernel is a critical component of the operating system and any issues with the driver can have serious consequences, Microsoft chose to take a cautious approach when it comes to development. Therefore, solutions that are configured with the kernel mode driver framework (KMDF) template are set to always treat any warnings as errors. While it is possible to disable this behavior, it is not recommended because the more complex the driver becomes, the harder it will be to troubleshoot.
Instead, we’ll modify our code to eliminate the error. The warnings indicate that there are two unreferenced function parameters: driverObject and registryPath. You can either use these parameters somewhere in your code or you can use the UNREFERENCED_PARAMETER() macro to mark them as knowingly “unused”.
With this adjustment, the driver should finally be complete:
1
2
3
4
5
6
7
8
9
10
11
12
13
14
15
16
17
#include <ntddk.h>

NTSTATUS DriverUnload(_In_ PDRIVER_OBJECT driverObject) {
    UNREFERENCED_PARAMETER(driverObject);

    KdPrint(("Goodbye World!\n"));
    return STATUS_SUCCESS;
}

NTSTATUS DriverEntry(_In_ PDRIVER_OBJECT driverObject, _In_ PUNICODE_STRING registryPath) {
    UNREFERENCED_PARAMETER(registryPath);

    KdPrint(("Hello World!\n"));
    driverObject->DriverUnload = DriverUnload;

    return STATUS_SUCCESS;
}
From here, make sure to set the target architecture to x64 and build the driver in Debug mode. If you’ve followed all the steps correctly, you should now have your very first HelloWorld.sys kernel driver!
Note
If you receive an error message similar to DriverVer set to incorrect date when you try to build your project, don’t worry. Simply go to the project’s properties and find the Inf2Cat configuration. Look for the row that asks you whether you want to use local time and select Yes (/uselocaltime).
Driver loading
With the driver compiled, we now need to transfer the driver to the testing VM by using the previously created network share. If you did not create a network share, find an alternative method for transferring the driver.
For the purpose of this demonstration, I have placed the driver in the Documents folder. To load it, I will use the OSRLoader application.
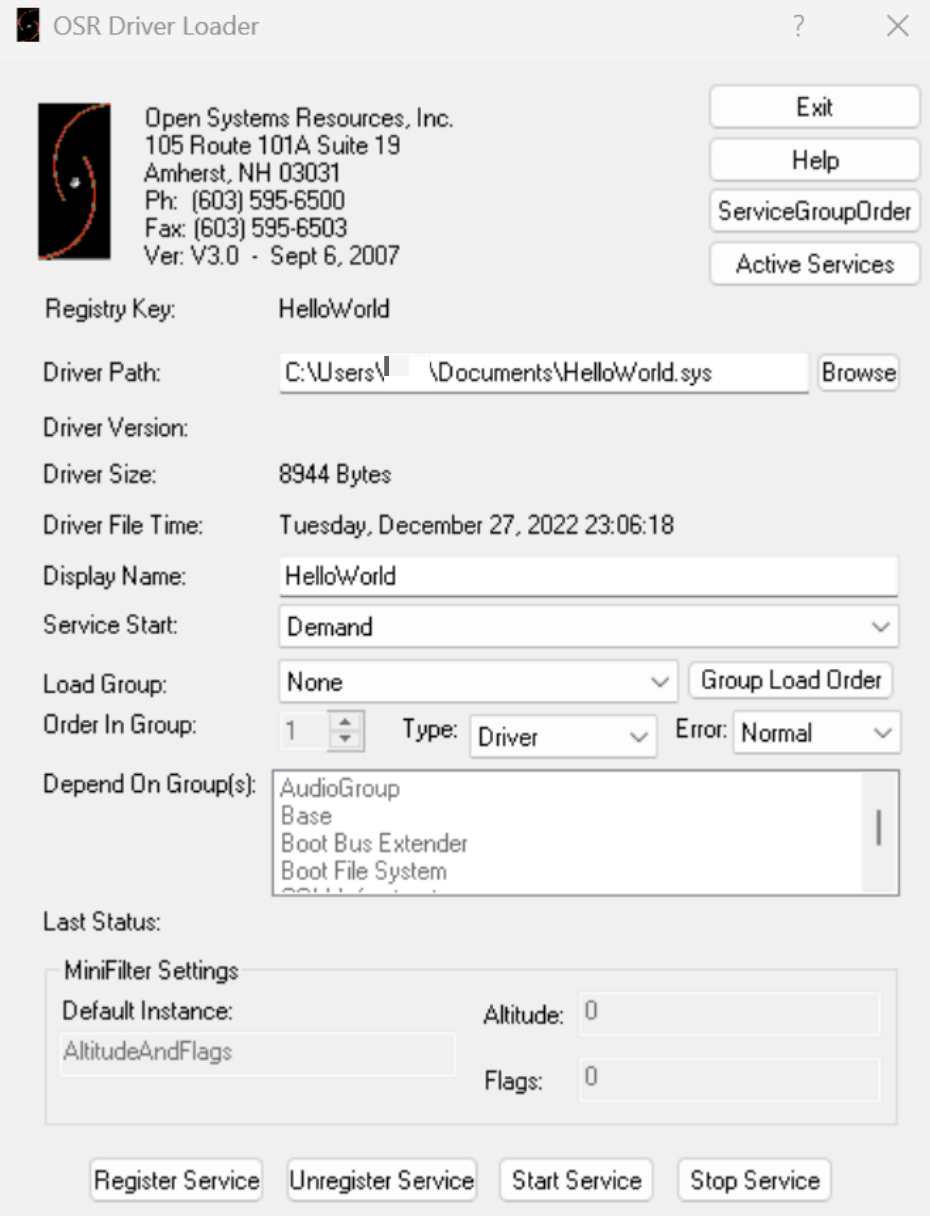
You do not need to configure anything else besides specifying the location of your driver. However take note, that when you’re loading the driver for the first time, you will need to register it as a service. To do this, click the Register Service button. You will receive an alert that informs you whether the action was successful or not. If it was successful, you can now click the Start Service button to load the driver and the Stop Service button to unload it!
With the service started and driver loaded, let’s check WinDbg to see if the driver is functioning as intended. Recall that we programmed the driver to print “Hello World” when it is loaded and “Goodbye World” when it is unloaded.
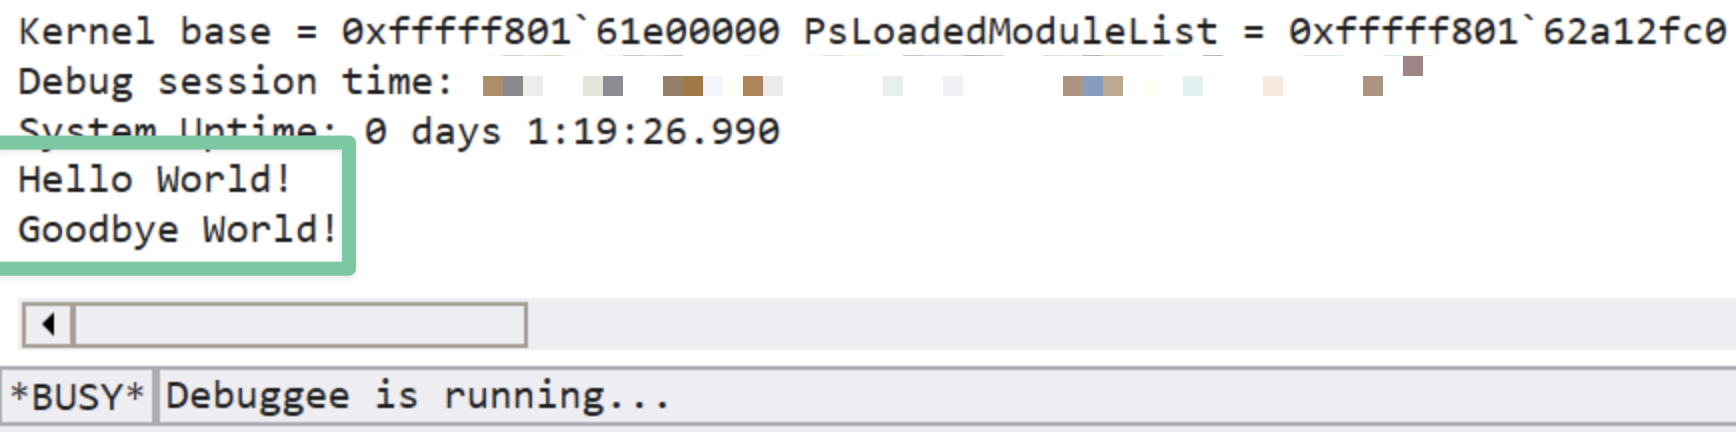
Perfect! That’s exactly what we wanted!
Conclusion
Thank you for making it to the end of the post! I appreciate you taking the time to read through it and I hope you found it useful and informative. Keep in mind that this was only the first part of the series, so make sure to keep an eye out for the next one! If everything goes right on my end, the next part should cover the process of creating a driver that can be activated remotely using custom network packets.
As always, if you have any questions or feedback, please don’t hesitate to contact me on Twitter or leave a comment below. Thanks again and see you soon!
GitHub
The code for this project can be found in the Blog-Lab repository on my GitHub.
Kudos
I want to express my gratitude to Jack Halon for proofreading this blog before its release!